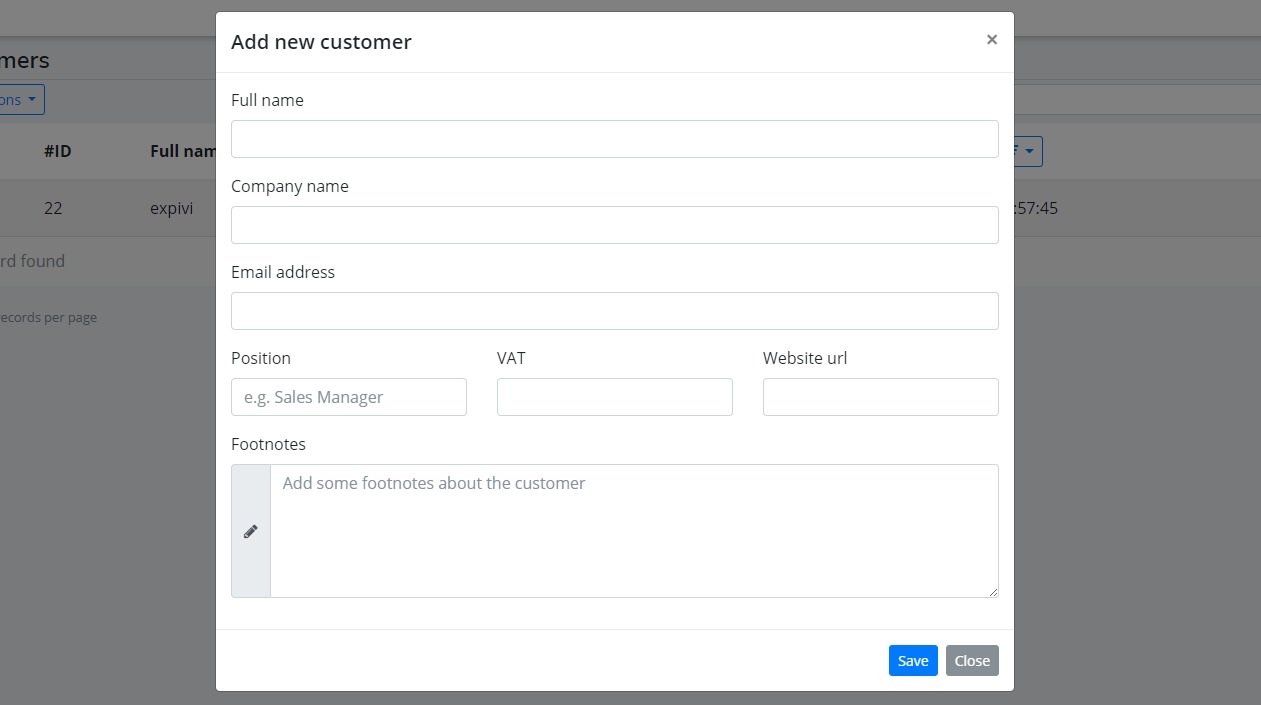
In the tab ‘Customers’ all customers can be viewed, edited, added or deleted.
To add a new member, follow these steps:
1. Click the blue ‘add’ button at the top right of the page
2. Fill in all the fields in the pop-up screen:

- Full name: First and last name of customer
- Company name: Company name of customer
- Email address: Email address of customer
- VAT: Value Added Taxes, VAT is an international number, without any spaces or dots
- Position: The job position of the contact person
- Mobile number: mobile number of contact person
- Website url: Refers to the link of the webshop of the customer
- Phone number: Company phone number
- Fax number: Company fax number
- Footnotes: Any notes about the customer can be saved here
3. Click the blue ‘save’ button
To view a customer or adding notes, select a customer in the overview. You can do this by clicking the note icon next to the customer or by simply clicking the customer.
Use the trash icon to delete a customer, confirmation is asked afterwards, choose ‘dismiss’ ‘remove all’ or ‘remove customer(s).

All the customer information can be found here and is divided in multiple tabs, everything that is added to a customer elsewhere (such as at sales and activities), is visible here straight away.
- Sales: All sales belonging to a certain customer can be viewed, edited or deleted here
- Invoices: All invoices are found here, they can be edited or deleted, you can see all the open, paid or refunded invoices straight away, by selecting the tab
- Addresses: One or multiple addresses can be used for a customer, these can be viewed (eye icon), added (‘add’ button) or deleted (trash icon) here
- Classes: Every customer is assigned to a tax class, these are used to define tax rules. Enter the tax class name and click ‘Save’
- Activities: All activities planned for a customer (such as a meeting) can be found here, you can also add, edit or delete them
- Tickets: When a customer leaves a question, note or problem for you, you can find and edit these here. You can sort these by selecting the status (show all, new, in progress, solved, cancelled). You can add a ticket yourself as well (use the ‘add’ button)
- Notes: In this tab you can easily leave notes about a customer
- At the field ‘new note’ fill in the note and click the blue ‘send’ button
- To make more notes, repeat step 1
- The notes will be visible under the textfield (in order of date, the newest one will be the first one)
- To delete a note, click the red ‘delete’ button, you will be asked for confirmation (click ‘cancel’ to go back or click ‘confirm’ to delete)
