For a 3D model to work properly in Expivi it needs to meet some requirements. In this document, we are going to explain the following requirements.
- Polycount max. 300k triangles
- Scene settings
- Clean polygonal geometry
- UV’s, textures and materials
- File type
- File size
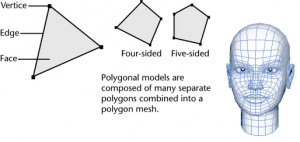
Polycount
The polycount represents the total number of polygons your model consists of. Polygons are straight-sided shapes (3 or more sides), defined by three-dimensional points (vertices) and the straight lines that connect them (edges). These polygons combined make up a 3d model.
For your model to function well in Expivi the polycount should be kept below 300.000 polygons. If you go over this number the load time of the configurator will increase. We found that a limit of 300.000 works best for both pc and mobile.
Scene settings
The 3D scene should be set to meters so that 1 unit = 1 meter. This can sometimes be corrected during the export to FBX. The Y+ axis is considered up and the Z+ axis is considered the front. For export, it is preferred if objects are centred with x and z = 0 and that the bottom of the bounding box rests on y = 0.
Clean polygonal geometry
The following errors will not give official errors during the import in the configurator but, it is highly recommended to follow the checklist as many errors with normals, flickering or unexpected results, in general, can be prevented.
- No n-gons (faces with more than 4 vertices)
- No non-manifold geometry (more than 2 faces who share a single edge)
- No lamina faces (faces that share all vertices with each other)
- No concave faces (faces that have an outline that curves inwards)
Always work with backface-culling on to prevent backwards-facing polygons.
The configurator has support for double-sided materials, but they are not optimal. Use backface culling in the 3D software viewport to spot reversed normals.
Make sure that the mesh itself is not double-sided. Sketchup has a tendency to export like this which can cause visual glitches in the configurator.
If the triangulation direction is important (curved surfaces) it should be done manually before the configurator importer does it automatically.
UV’s, textures and materials
Each face should be UV mapped, even if it is done automatically. The configurator supports a second UV set but only for lightmapping. This means that everything in the second set should not be overlapping and should be within the 0-1 legal range.
Use the lowest possible texture resolution. A 1024×1024 map is ideal, 2048×2048 textures are acceptable but a bit slower. In general, stick to powers of 2 (2 x ) for texture sizes.
The most efficient file type is .jpg. Although lightweight, jpg can introduce horrible compression artefacts. If these artefacts are very noticeable consider switching to .png. Png is the standard file type for adding transparency.
The repetition of textures is handled in many different ways across 3d packages. The simplest way to achieve tiling is to scale the UV’s until the desired repetition is achieved.
Most of the problems we have encountered are regarding the UV’s and the texture maps. Usually what happens is that the 3D files we receive contain unique UV/texture sets at the size of 4096×4096. This could create a problem because of the fact that the Expivi platform reduces all imported textures to 2048×2048.
The problem does not lie with the unique UV set, so those must still be created, but with the unique textures that are delivered. What we are suggesting is the following:
For example, take this couch, the product itself contains two materials (materials, as in the actual materials with which this product is assembled), the fabric and the wooden poles.
What we prefer is that those two components each have their own material (Material, as in a 3D material)
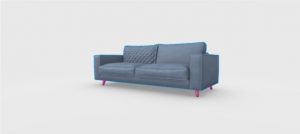
Fabric is indicated by the Blue Colour.
Wood is indicated by the Pink Colour.
This way it is easy for us to manipulate the scale of the material as well as preserve a high resolution.
As for the UV sets, these must still be created uniquely (With all components included), this makes it easy for us to swap them over to the second UV slot and use them for lightmaps.
Conclusion: When a model and it’s UV’s are created the different components must each be assigned to their own material (The material must be named accordingly).The textures must be tileable/seamless for us to scale up the UV’s if necessary. Also, the created UV set must be unique to be used as lightmapping.
File type
Expivi accepts a number of different file types for 3D models; FBX files, OBJ files, or DAE files.
- OBJ files: These files are fine when using Import as a plain model during the importing process in Expivi, but are not ideal for configurable models since they don’t bring along the hierarchy during export.
- FBX files: This file type is the preferable option for exporting a configurable model. Fbx files retain the hierarchy that is created in the 3D software, and this makes it especially useful for working with Expivi.
- DAE files: This file type is very similar to FBX. It has largely the same options and also retains the hierarchy, but the biggest difference is the file size. With the same export options, a DAE file will be 5 times larger than an FBX file. For a smaller/simpler product this may not seem like a big deal, but when it’s concerning a more complicated product keeping the file size as small as possible is crucial.
File size
The maximum file size that Expivi will accept is 100mb. For most projects this is plenty, but when dealing with a large project it can happen that an export with the entire hierarchy and all the models is larger than 100mb. In this situation, the file will need to be exported as 2 or more files so that the individual file sizes are smaller than 100mb. In the Exports make sure you use the names hierarchy, expivi will recognize this hierarchy and stitch the file back together.