Create a group
You can create a material group inside of your 3d program using a Mat group node as such:
- Material Group: used to assign the same material to all meshes in the group.
Suffix: mat_”group name”_e
All meshes placed in the group will be linked to the same material group, a material group in Expivi tells the program to change the material of the entire group.
For a complete explanation about hierarchy please check the hierarchy document.
Create the materials
Next, you need to have extra materials to put inside your groups. In the material folders, you can either select the add button on the top right to create an extra material, or you can duplicate an existing one using the duplicate button underneath the save changes button.
These materials can then be altered to anything you want. Make sure you give them recognizable names to improve simplicity later on.
Filling the groups
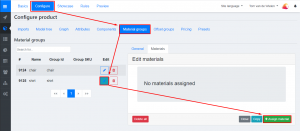
The last step is to add your materials to the correct group. Inside of your product navigate to configure and then material groups. In this tab, you find all the groups you created inside of your 3d program. Select the pencil to edit and switch to the materials tab. In this tab, you can select the assign material button to open the materials window. In this window, you can select multiple materials at once to add them inside of your group. When you have selected all of your materials click on the blue select button to add them.
Once you have added your materials inside of a group you can drag them around to change the order. The order will be the same for the end result of the configuration.