To take advantage of the automatic creation of options inside the configurator it is important to properly prepare and organize your 3D scene. The automatic conversion relies heavily on grouping objects together or placing them under empty/NULL nodes and following a specific naming convention.
- In Maya preparation these nodes are created by the “empty group” function.
- In 3DS Max preparation these nodes are created by the “helpers->container” function.
- In Blender preparation these nodes are created by the “empty” function.
Expivi works with naming conventions for certain functions. You can find a list below of all the naming conventions and the corresponding function. All conventions start with the name followed by a lower dash “_” next comes the name of the group you are working on. To close, type “_e” the “e” stands for ‘end’ and closes the loop, everything typed afterwards will not be taken into account.
Example suffix:
cat_Expivi_e
Functions:
- Category: A category creates a question for Expivi
Suffix: cat_”group name”_e
Categories are for the questions in Expivi, these can be answered by options, options are used to configure your product. A Category can never sit inside another Category.
- Option: Are parts of your product that can be configured
Suffix: opt_”group name”_e
All meshes placed in the Option will be affected by the attribute assigned to it in Expivi. A option function always needs to be nested inside a Category function.
- Material Group: used to assign the same material to all meshes in the group.
Suffix: mat_”group name”_e
All meshes placed in the group will be linked to the same material group, a material group in Expivi tells the program to change the material of the entire group. Material groups are not limited in placement in your hierarchy.
- Offset Group: used to create moveable elements.
Suffix: off_”group name”_e
All things placed in the Offset group will use the same offset point. The offset point or pivot indicates the location of where the group will move or turn. You can place all other functions in a offset group if you wish, making it so that everything below the offset group moves uniformly.
- ID Reference: used to id and reference: this duplicate parts of a model without having that part loaded twice in your 3D program. This is a combination of 2 functions; id and ref.
Suffix: id_”samegroupname”_e
Suffix: ref_”samegroupname”_e
ID references can be set up in your 3D program to let Expivi know to duplicates the meshes from your ‘’id’ group to all ‘’ref’’ groups without actually having that model duplicated in your 3D software. Start by placing the model you want to reference in your ‘’id_example_e’’ group. Next, whenever you make a ‘’ref’’ group which has the same name in this case “ref_example_e” the data and geometry inside the id group will be duplicated to the ref group. The placement of the ‘’ref’’ model do not depend on the coordinates of the ‘’id’’ group in your scene. The ‘’ref’’ group does not need to contain any geometry for this to work. You can place the “ref” group at any given location and the data and geometry from the “id” group will be transformed to the “ref” location.
The referencing happens in Expivi and will not show in your 3D program. This function is useful to quickly deploy a change across all “ref” groups while only adjusting the “id”group.
- Product Reference is used to reference and duplicate entire configured products within Expivi. This can be useful when you want multiple products to load at the same time.
Suffix: product_”productID”_e
This function calls another configured product inside your backend into your current product. The function opens with ‘’Product_” followed by the product ID number that can be found in the backend, closed off with ‘’_e’’.

General rules:
- A category always has to be followed by an option. You can, however, add another question inside of that option.
- You can also leave an option empty to be able to switch a mesh on and off.
- Material and offset nodes can be placed anywhere inside of the hierarchy.
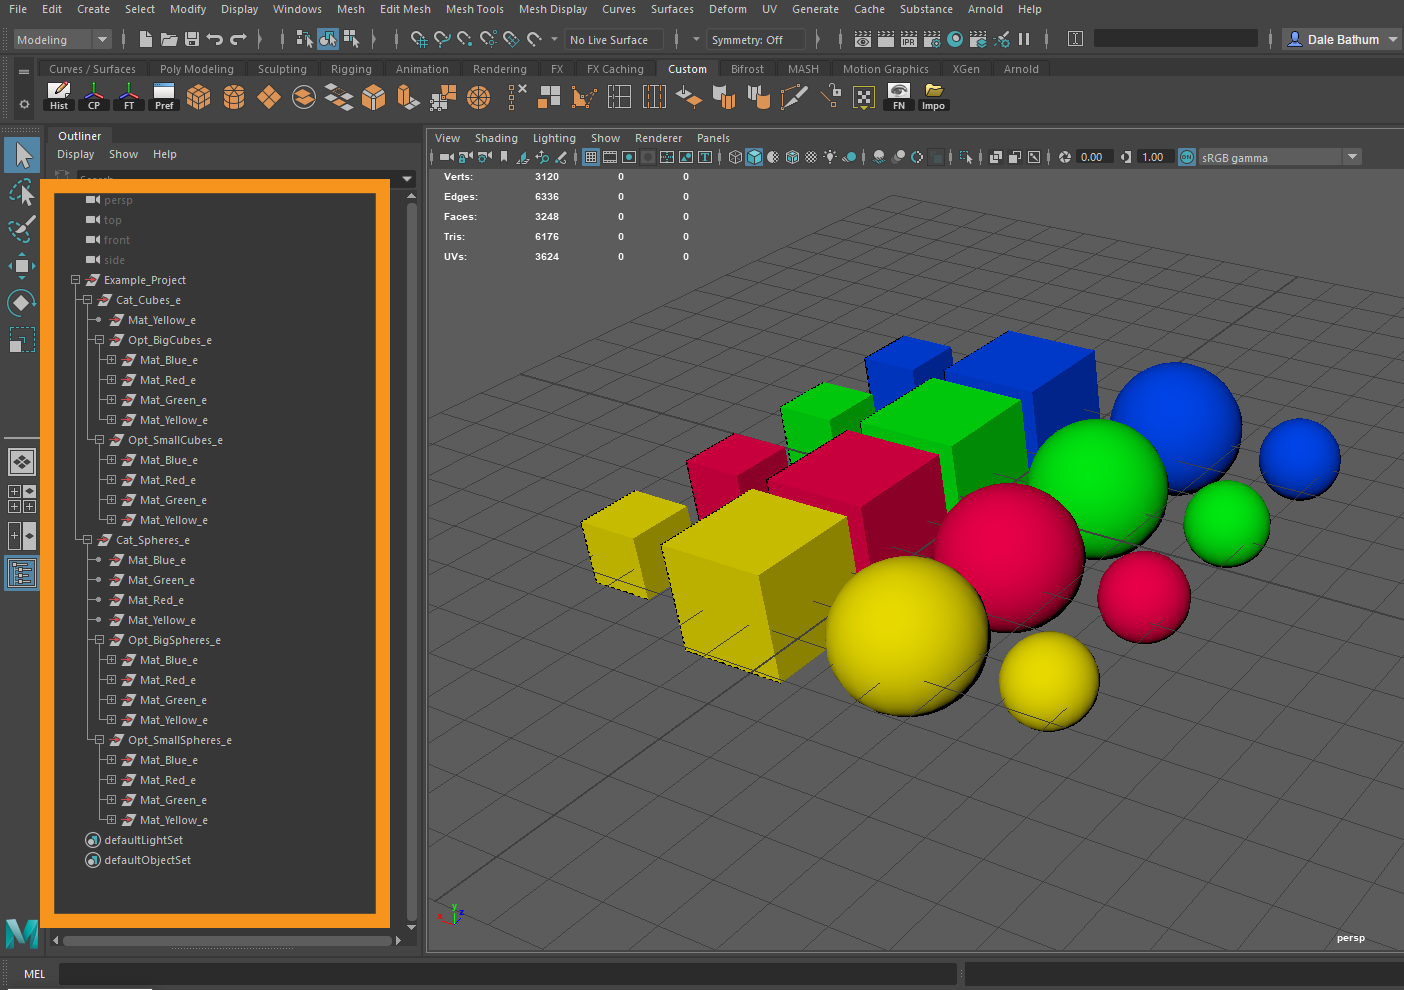
Example of a finished hierarchy:
This product has 2 categories; cubes and spheres. Each has 2 options, ‘Big’ and ‘Small’. Both options have 4 material groups assigned to them. Uploading this to Expivi will result in these options:
Cubes → 1 – BigCubes, 2 – Smallcubes
Spheres → 1 – BigSpheres. 2 – Smallspheres
Besides the options, all 4 materials can be edited separately thanks to MatGroups. For instance, changing the ‘’Blue’’ material within Expivi’s material editor will result in all blue shapes changing at the same time.