If you’re looking for the old Shopify Integration Guide, go to this page.
This page will guide you through the installation process of the Expivi Shopify App and the setup of your first 3D model. Keep in mind that if you already have an Expivi account, it’s best to use the old method described on this page: Shopify Integration Guide. Please contact our team if you have any questions.
Table of Contents
Install and setup the Expivi Shopify app
1. Install the “3D and AR Product Configurator” app in your Shopify store.

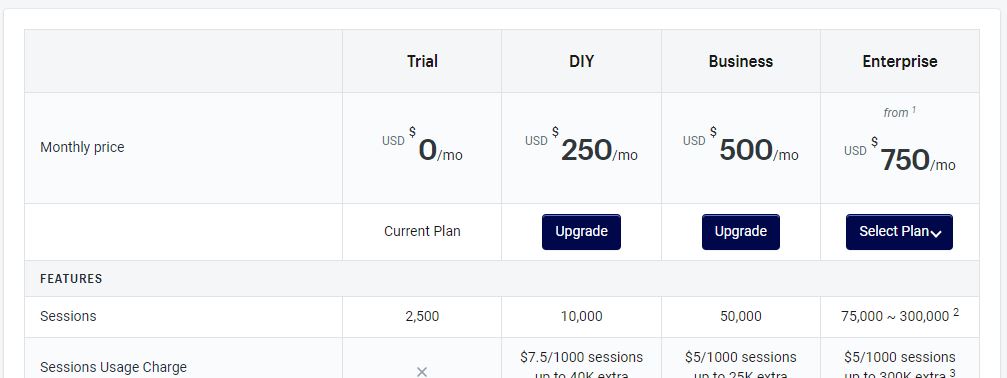
2. Choose a subscription, click on the Continue button and your Expivi Account will be created automatically.
3. In the app settings, navigate to the General tab:
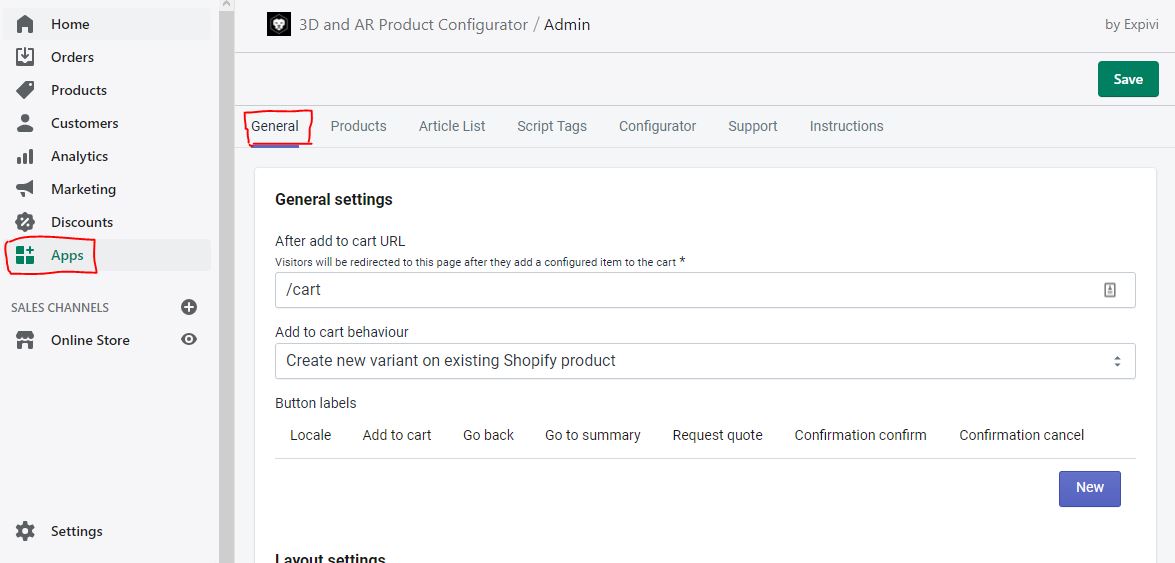
- “After add to cart URL” setting: make sure this field has the value “/cart” (without the quotes)
- “Add to cart behaviour” setting: leave it to the default option “Create new variant on existing Shopify product”
- “Button labels” setting: in case you have a multilingual website, you can translate each button label. For review purposes, use the default settings.
- “Layout settings”: you can change the appearance of the Price and “Add to cart” button here. For review purposes, use the default settings.
- “Cart validation”: you can add specific validation scripts for the “Add to cart” button, but for review purposes, leave it empty.
- “Confirmation Notification”: you can show a confirmation whenever someone clicks on the “Add to cart” button. For review purposes, leave it unchecked
- “Summary page settings”: you can show a summary of the complete configuration, whenever someone adds a product to the cart. For review purposes, leave it unchecked.
Note: don’t forget to click the “Save” button whenever you change a setting.
Setup a 3D model
In the app settings, navigate to the Instructions tab, where you’ll find a short explanation on how to setup a 3D model. You’ll find the same instructions below.

1. For testing purposes, download this sample FBX file: https://download.expivi.com/expivi-sample-product.zip.
2. In the Configurator tab (the Expivi backend), navigate to Catalogue in the left menu (click on the blue hamburger menu to open the side panel).
• Click on the Add button in the top right corner to create a new product.
• Enter a product name and click on the blue Save button at the bottom of the popup window. You’ve now created the product.
3. Now we need to upload the 3D model for this new product.
• Open the new product and navigate to the “Configure” tab (at the top). You’ll be prompted by the “Imports” tab.
• Click on the “Import wizard” button. You can now upload the sample 3D file you’ve just downloaded, by clicking on the “Choose Files” button, choose the file on your computer and click on the “Upload all” button.
• Click the “Next” button, leave the settings as they are, and hit the “Import” button. The 3D model is now uploaded to the Expivi account.
Linking a Shopify product with the 3D product
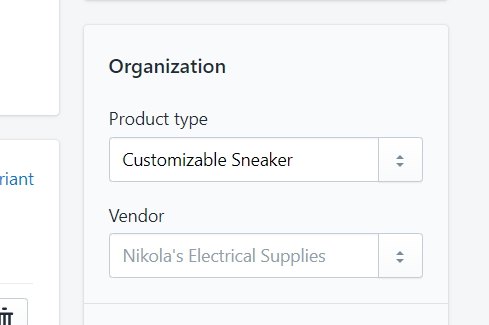
If you haven’t created your products in your Shopify storefront yet, do that first. The most important part in creating the products is to set the correct “Product type” so that the system can detect if it’s a normal Shopify product (e.g. “Sneaker”) or a Shopify product with Expivi’s 3D configuration (e.g. “Customizable Sneaker”).
Note: the “Product type” will be used as the shop categories too.
If you already have existing products in your shop, make sure you’ve set a product type for these as well.
To connect your products in Shopify with the products on the Expivi platform, go to the Expivi settings in Shopify (Apps > Expivi). All products in your Shopify storefront are listed under the Products tab.
Next to each product, you’ll find a drop down menu with all the products on the Expivi platform. Select the corresponding product for each product and click “Save”.
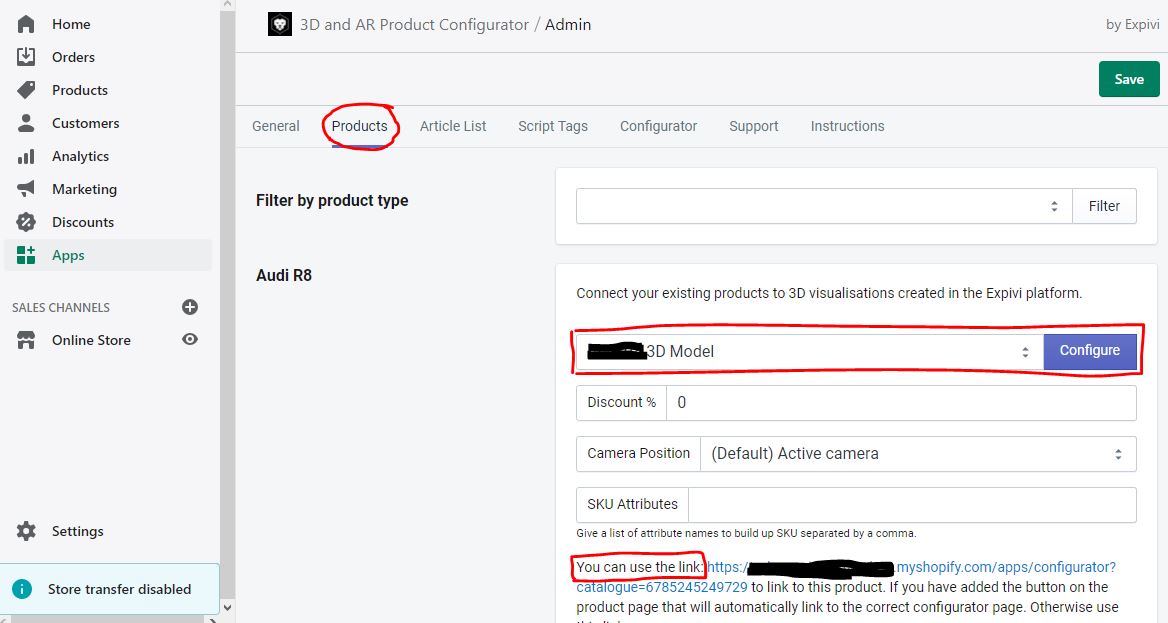
Well done, you’ve successfully integrated the 3D configurator with your Shopify shop! Underneath the connected product, you’ll find a link (“You can use the link…”). Clicking on the link will take you to the 3D configurator.
After saving, the Configure button will appear next to each product.

Clicking on the Configure button will take you to 3D product viewer configuration. When you’ve finished configuring the product you could click Save to save the configuration and this will be the standard configuration that will be shown every time a customer visits the product page.
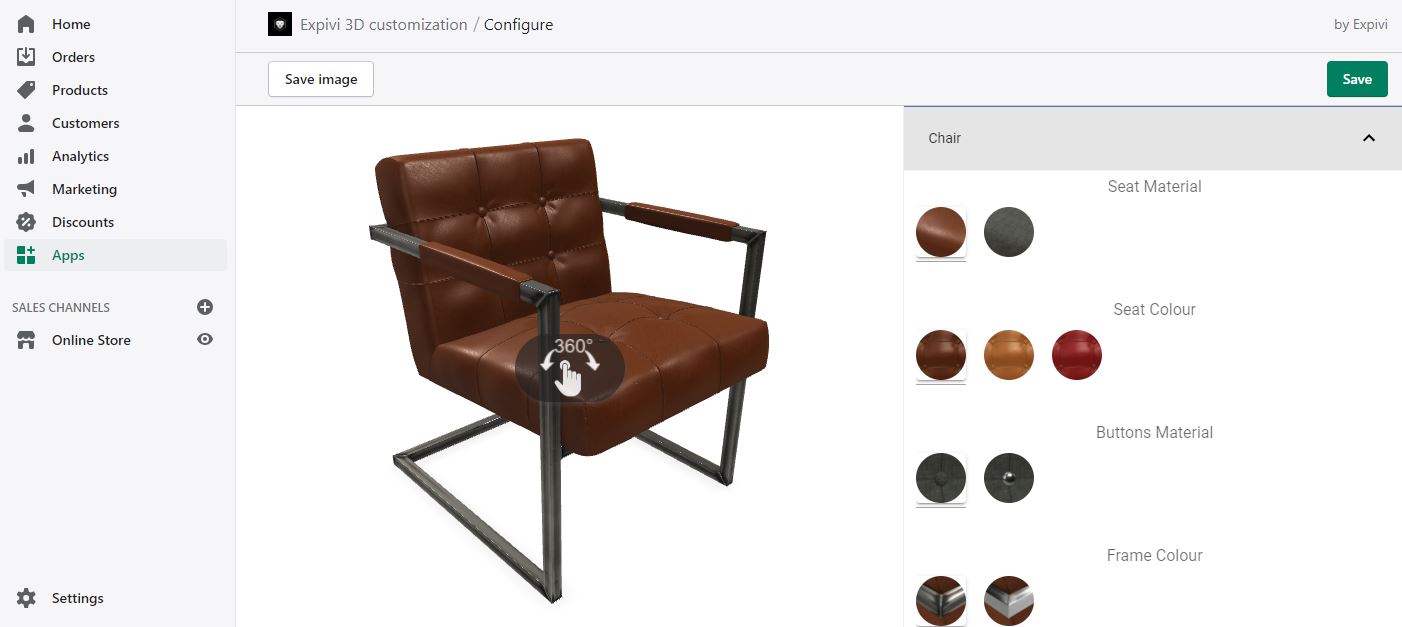
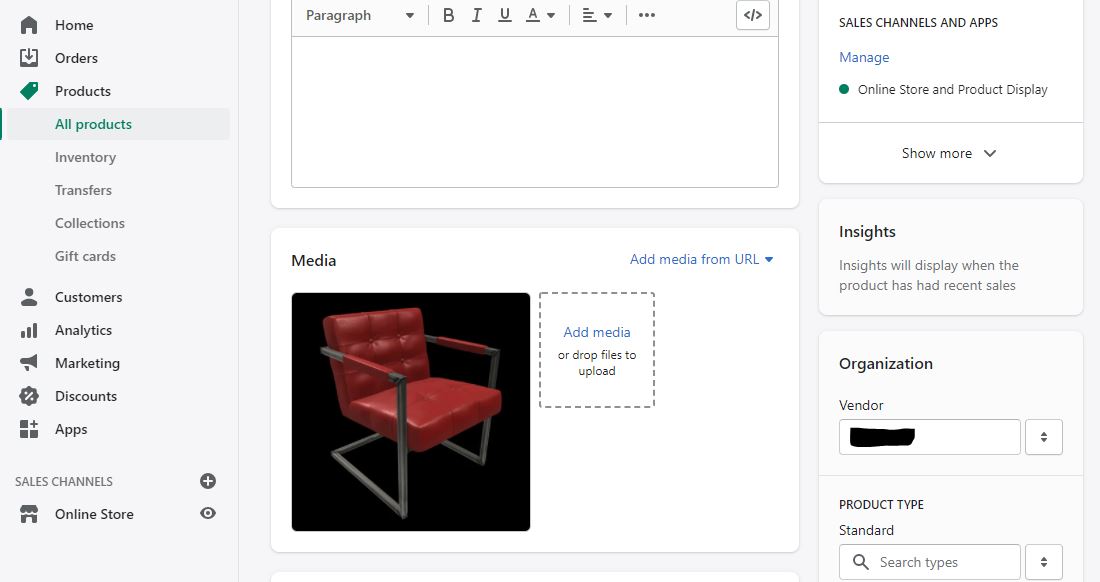
If you click on the “Save image” button the configuration shown in the viewer will be saved as an image for your product page. This will be automatically added as a product image to the product page.
Repeat this step for every product you have.
Add custom code to Shopify template
Integrating Expivi with your Shopify storefront requires some modifications to the theme files of the theme you’re using for your Shopify storefront. If you have no knowledge to do this yourself, please ask a developer to do this for you.
Be aware that each theme has its own unique code, so the instructions below should be used as an example.
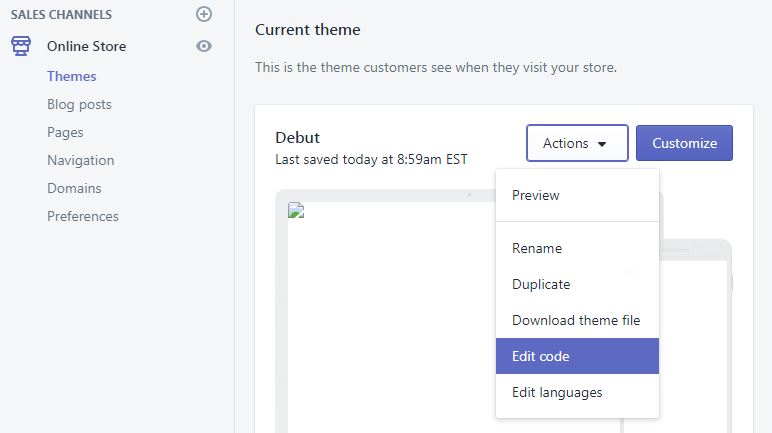
Go to Online Store > Themes and select Edit code in the Actions drop down menu. You’ll be taken to the template files editor.
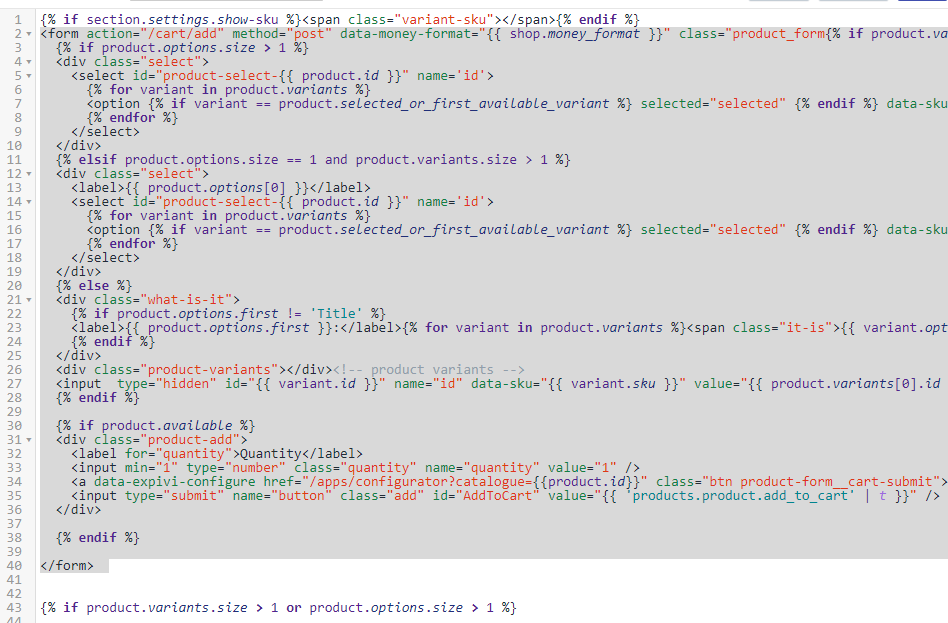
Replacing “Add to cart” button with “Configure” button on the product page
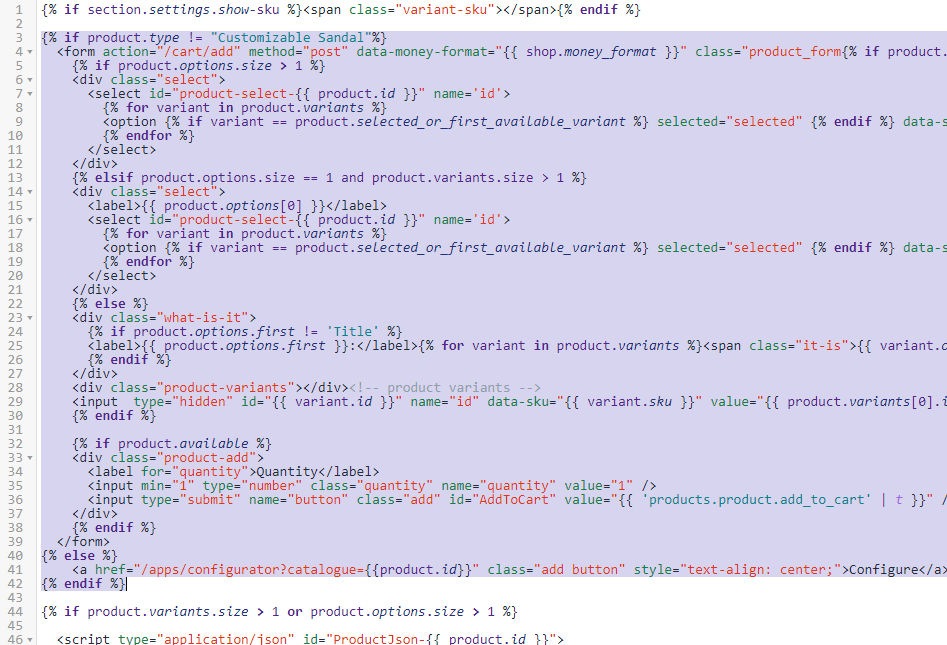
First of all, we’re going to replace the original “Add to cart” button with the Expivi “Configure” button on the product page. This piece of code will look if the product is a normal Shopify product or a Shopify product with Expivi’s 3D configuration (based on product type) and then replaces the “Add to cart” button with a “Configure” button.
The code looks like this:
{% if product.type != "Customizable Sneaker"%}
<!-- PUT THE ORIGINAL ADD TO CART FORM/BUTTON IN HERE -->
{% else %}
<a href="/apps/configurator?catalogue={{product.id}}&currency={{cart.currency.iso_code}}&locale={{request.locale.iso_code}}"
class="btn product-form__cart-submit">
Configure</a>
{% endif %}Note: “Customizable Sneaker” is being used here as an example. Replace this with the correct product type you’ve created earlier.
Note: To have the “Configure” button look to same as the original “Add to cart” button, use the same CSS classes and selectors or copy the CSS code from the original button and apply it to the new “Configure” button.
Locate the file where the original “Add to cart” form or button is located and add this code to this file.
Don’t forget to click “Save” to save the modifications.
Note: the images below are examples, it may differ from your theme files.
Before:
After:
Adding product configuration information to the shopping cart
Next step we’ll be adding some extra product configuration information next to the product thumbnail in the shopping cart.
Note: location and names of the template files may differ in your own template.
Under the Sections section, find and open the cart-template.liquid file.
Find the line with
{% for item in cart.items %}
(on the image below it’s on line 17) and copy and paste the following code right below this line:
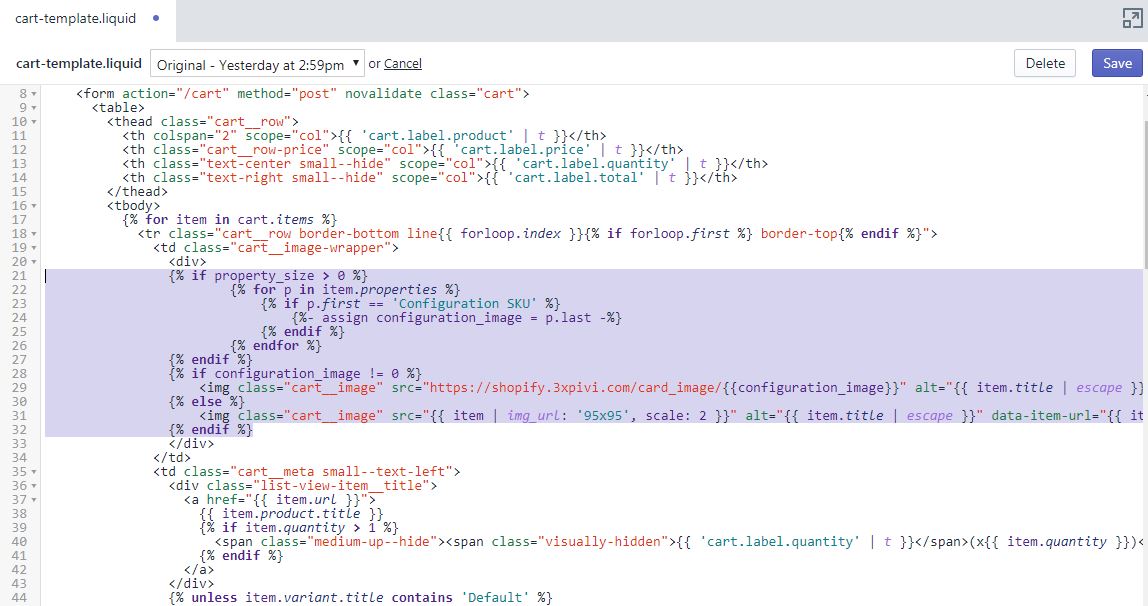
{%- assign property_size = item.properties | size -%}
{%- assign configuration_image = 0 -%}
The code will look like this:

Now we’re going to replace the original thumbnail code with new thumbnail code with some extra information. Locate the following line of code:
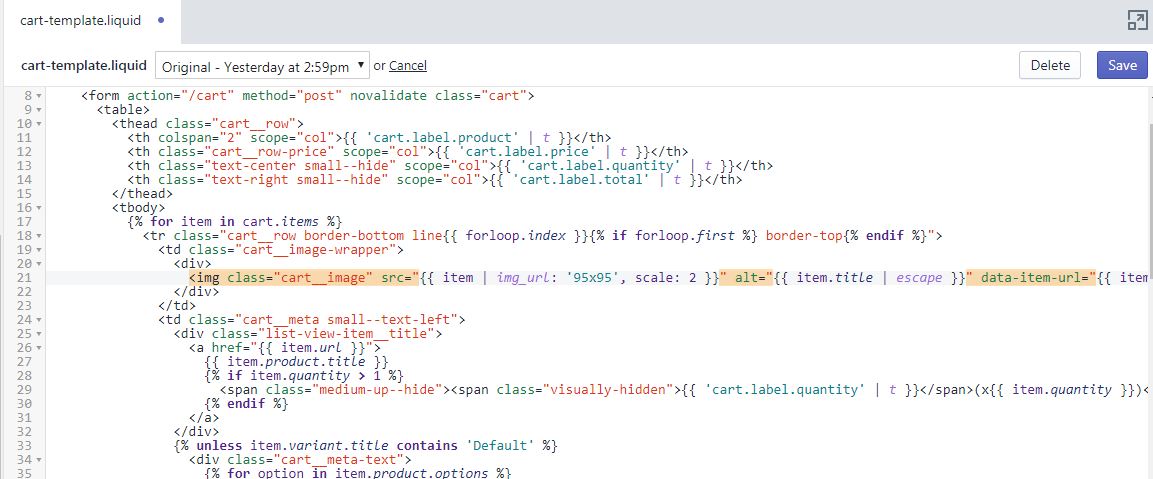
And replace it with the following code:
{% if property_size > 0 %}
  {% for p in item.properties %}
    {% if p.first == 'Configuration SKU' %}
      {%- assign configuration_image = p.last -%}
    {% endif %}
  {% endfor %}
{% endif %}
{% if configuration_image != 0 %}
  <img class="cart__image" src="https://shopify.3xpivi.com/card_image/{{configuration_image}}" alt="{{ item.title | escape }}" data-item-url="https://shopify.3xpivi.com/card_image/{{ configuration_image }}">
{% else %}
  <img class="cart__image" src="{{ item | img_url: '95x95', scale: 2 }}" alt="{{ item.title | escape }}" data-item-url="{{ item.url }}">
{% endif %}
The code will look like this:
Don’t forget to click “Save” and you’ve integrated Expivi with your Shopify storefront!
Fonts
When using the text_to_image attribute for product configuration, you can assign fonts to be selectable.
The fonts are provided by fonts.google.com
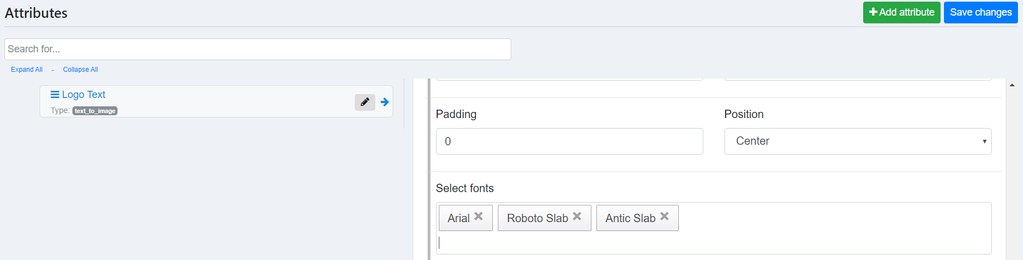
To be able to use these fonts in the Shopify storefront, an addition to the stylesheet has to be made. As seen in the image above two fonts are added in addition to the system font “Arial”. To load these fonts in the Shopify storefront, the google provided stylesheet url must be added to the stylesheet of the theme.
Warning: It is also possible to add a custom font. In this case the same changes apply, however the stylesheet url must be provided by yourself.
Info: If the Shopify theme already uses the same fonts, no actions are needed and this part can be skipped.
For example:
<link href="https://fonts.googleapis.com/css?family=Antic+Slab|Roboto+Slab&display=swap" rel="stylesheet">Find “theme.liquid” in the Theme files (See 4. Add custom code to Shopify template) and find the line:
<link rel="canonical" href="{{ canonical_url }}">
Add the google provided stylesheet url underneath this line.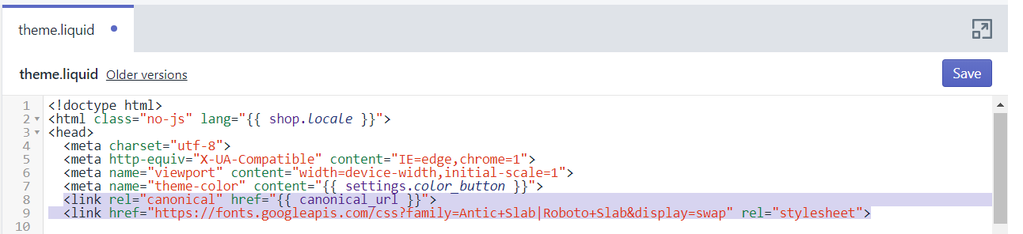
Press “Save” to store the changes, and you’re done!