If you’re looking for the new Shopify App Installation Guide, go to this page.
Since September 2022, we can’t offer our private app anymore. Contact our support desk and we’ll create a custom app for you.
Table of Contents
Examples
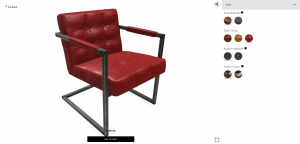
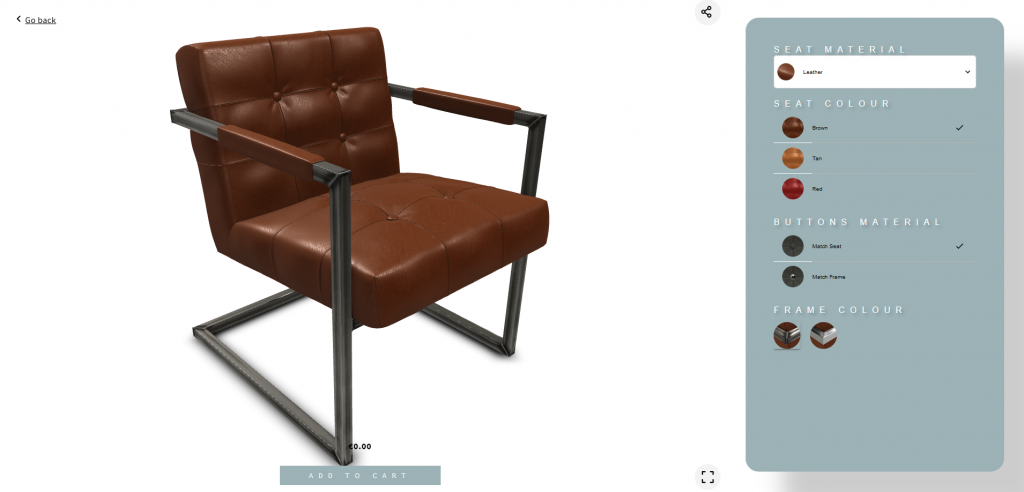
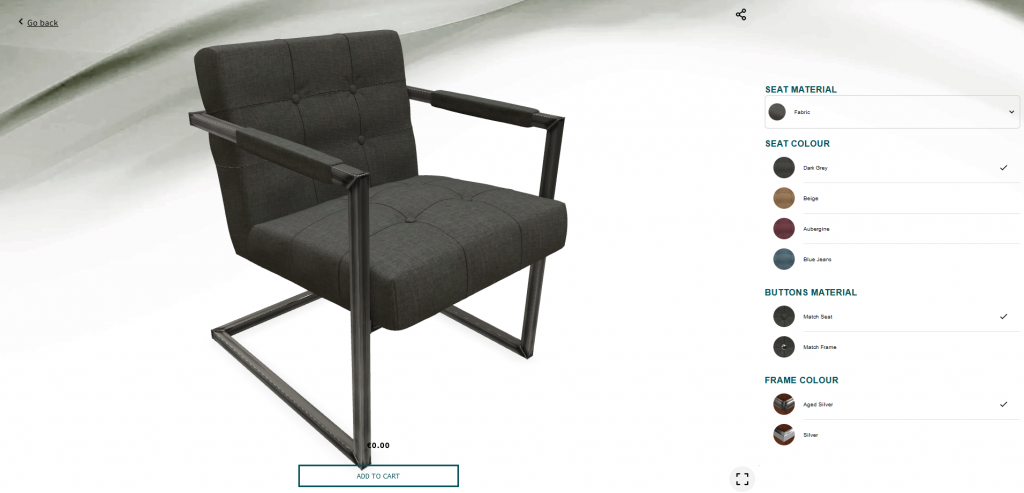
The power of the Expivi 3D configurator lies within the easy and highly customizable integration within your Shopify webshop. While the out-of-the box integration method with the Shopify Expivi plugin already looks great, you can create the fantastic looking product pages with some CSS and JS (if needed) that fits your brand completely.
In these examples, you can have quick look what you can achieve with the out-of-the-box Expivi plugin (example 1), with some custom CSS styling (example 2) or with a lot of custom CSS, JS (example 3).
Supported features overview table
| Features | Supported | How | Documentation |
| Presets | Yes | – | – |
| Request quote PDF | Yes | – | – |
| Social Media sharing | Yes | Standard Expivi feature | Social media sharing |
| Change viewer/options size | Yes | CSS styling | Change viewer |
| SKU | Limited | Standard Expivi feature | Using SKUs in Shopify |
| Attribute pricing | Yes | Standard Expivi feature | Attribute pricing |
| BOM | Yes | Standard Expivi feature | – |
How to integrate the Expivi 3D configurator with Shopify
Installing and integrating Expivi in your Shopify shop can be done in 5 steps. We assume that you’ve already setup your Shopify store and products.
1. Install the Expivi plugin for Shopify
Since September 2022, we can’t offer our private app anymore. Contact our support desk and we’ll create a custom app for you.
2. Creating the access token
Go to the backend of Expivi (https://admin.expivi.net/) and go to Team > API Keys. Create a new API key by clicking the “Create” button in the top right corner. A small pop-up box will appear. Give the API key a descriptive name and set the Role to “Viewer Token”, leave the host on “*”. Now click on “Create“.
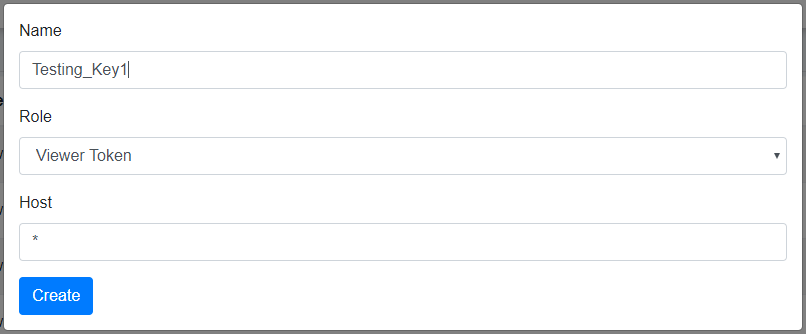
You’ll see a new popup window with the access token. Copy the access token in a text file. Warning: the access token will only be shown once and cannot be retrieved again. You’ll have to create a new access token if you need one.
Go back to your Shopify backend and go to the Expivi plugins settings (Apps > Expivi). Under General settings paste your API key in the API key field and make sure that API URL is https://expivi.net/api and hit “Save”.
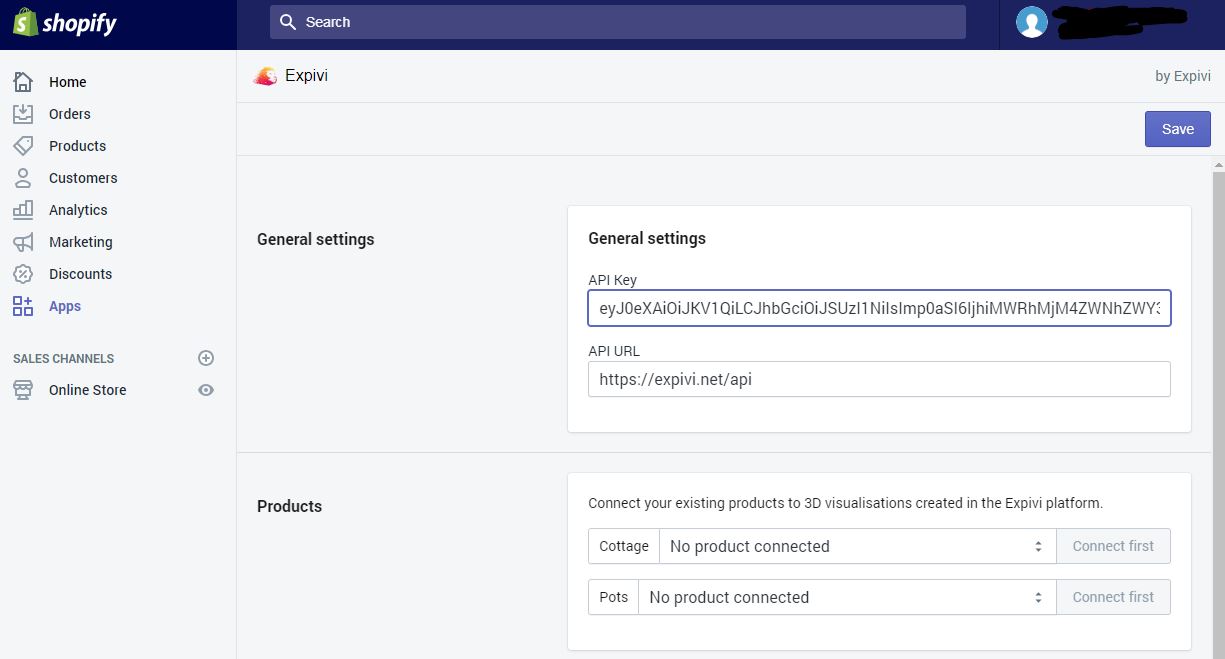
You’ve now integrated Expivi with your Shopify store.
3. Connect products in Shopify with products in Expivi
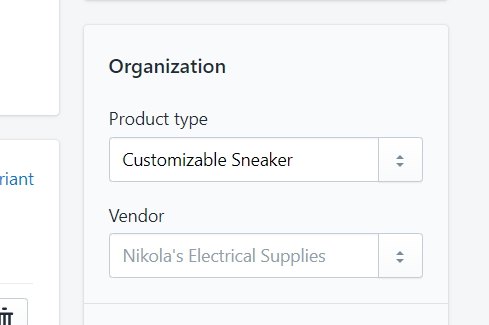
If you haven’t created your products in your Shopify storefront yet, do that first. The most important part in creating the products is to set the correct “Product type” so that the system can detect if it’s a normal Shopify product (e.g. “Sneaker”) or a Shopify product with Expivi’s 3D configuration (e.g. “Customizable Sneaker”).
Note: the “Product type” will be used as the shop categories too.
If you already have existing products in your shop, make sure you’ve set a product type for these as well.
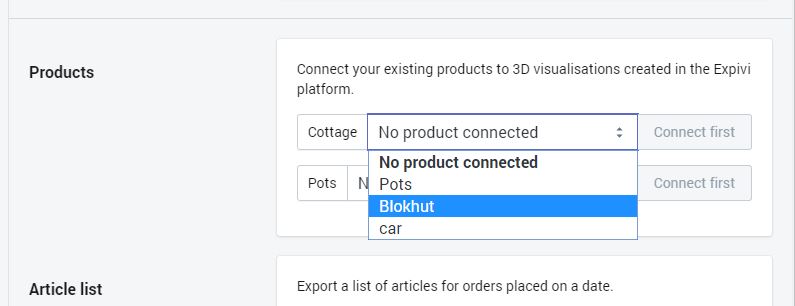
To connect your products in Shopify with the products on the Expivi platform, go to the Expivi settings in Shopify (Apps > Expivi). All products in your Shopify storefront are listed under the Products section.
Next to each product, you’ll find a drop down menu with all the products on the Expivi platform. Select the corresponding product for each product and click “Save”.
After saving, the Configure button will appear next to each product.
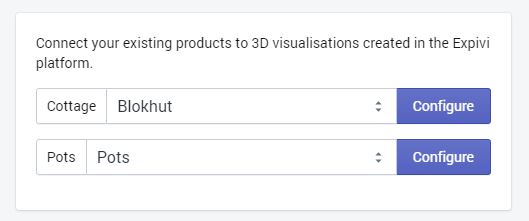
Clicking on the Configure button will take you to 3D product viewer configuration. When you’ve finished configuring the product you could click Save to save the configuration and this will be the standard configuration that will be shown every time a customer visits the product page.
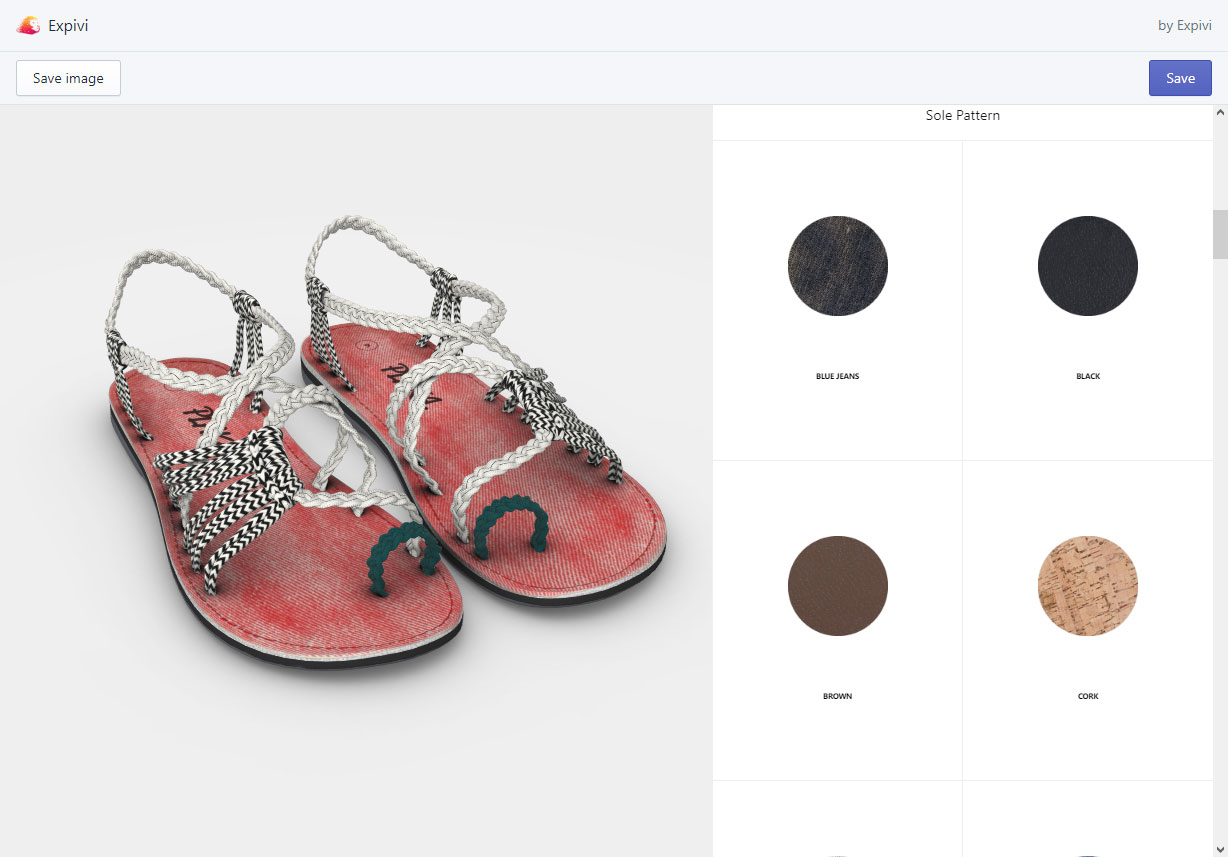
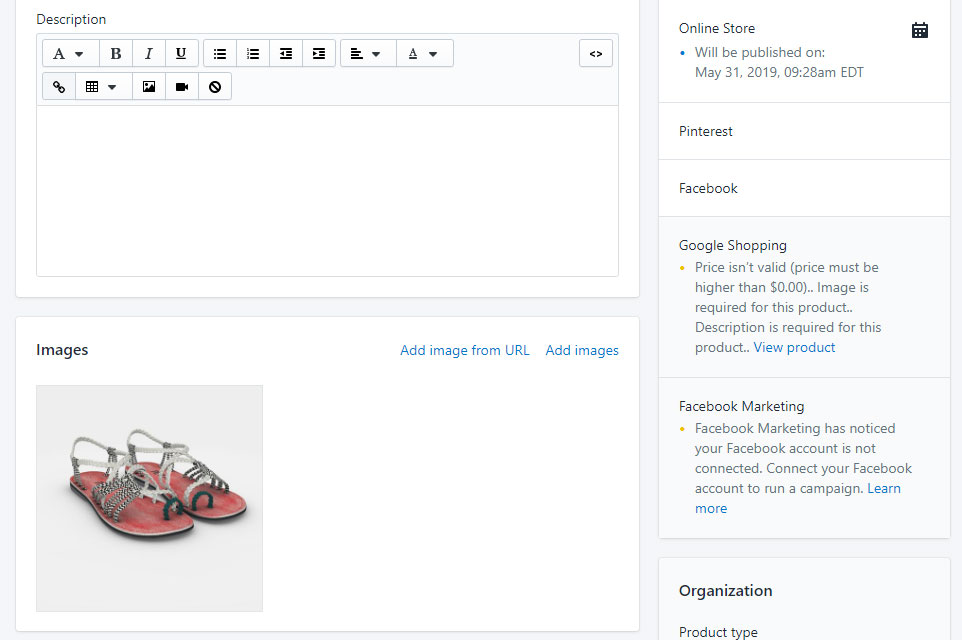
If you click on the “Save image” button the configuration shown in the viewer will be saved as an image for your product page. This will be automatically added as a product image to the product page.
Repeat this step for every product you have.
4. Add custom code to Shopify template
Integrating Expivi with your Shopify storefront requires some modifications to the theme files of the theme you’re using for your Shopify storefront. If you have no knowledge to do this yourself, please ask a developer to do this for you.
Be aware that each theme has its own unique code, so the instructions below should be used as an example.
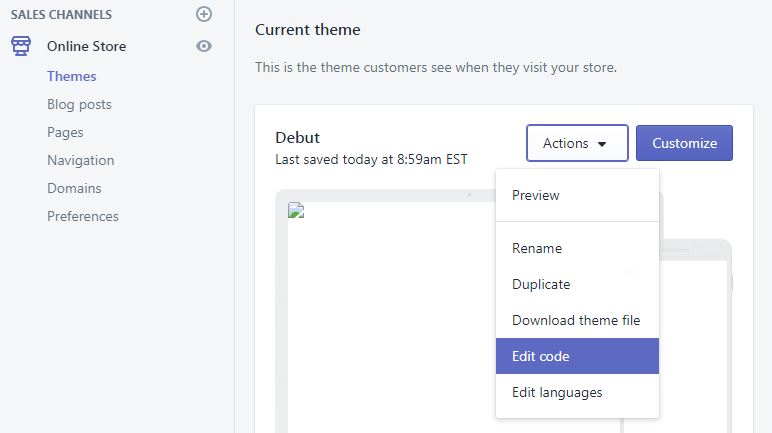
Go to Online Store > Themes and select Edit code in the Actions drop down menu. You’ll be taken to the template files editor.
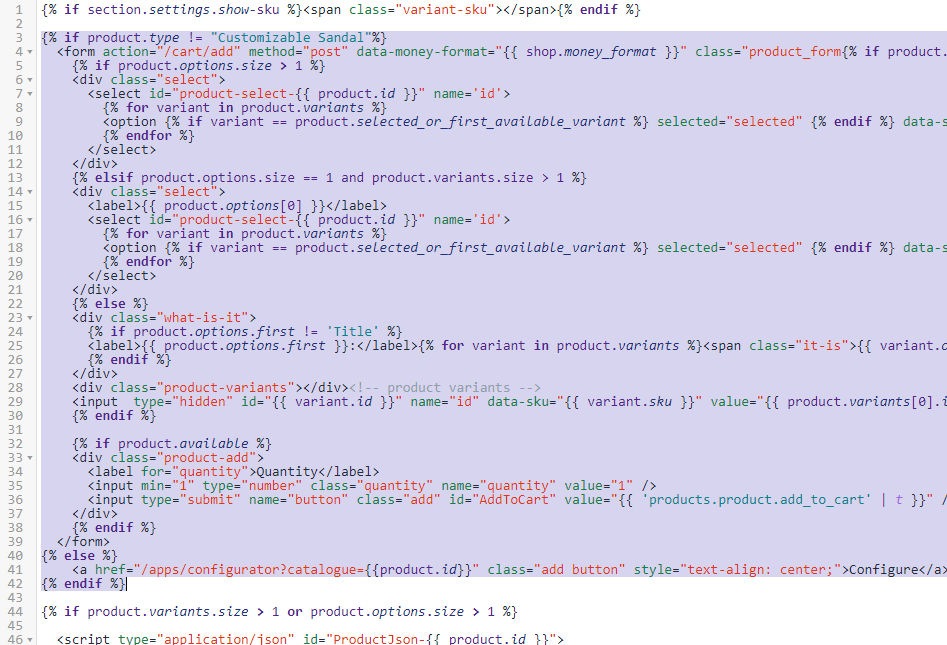
4.1 Replacing “Add to cart” button with “Configure” button on the product page
First of all, we’re going to replace the original “Add to cart” button with the Expivi “Configure” button on the product page. This piece of code will look if the product is a normal Shopify product or a Shopify product with Expivi’s 3D configuration (based on product type) and then replaces the “Add to cart” button with a “Configure” button.
The code looks like this:
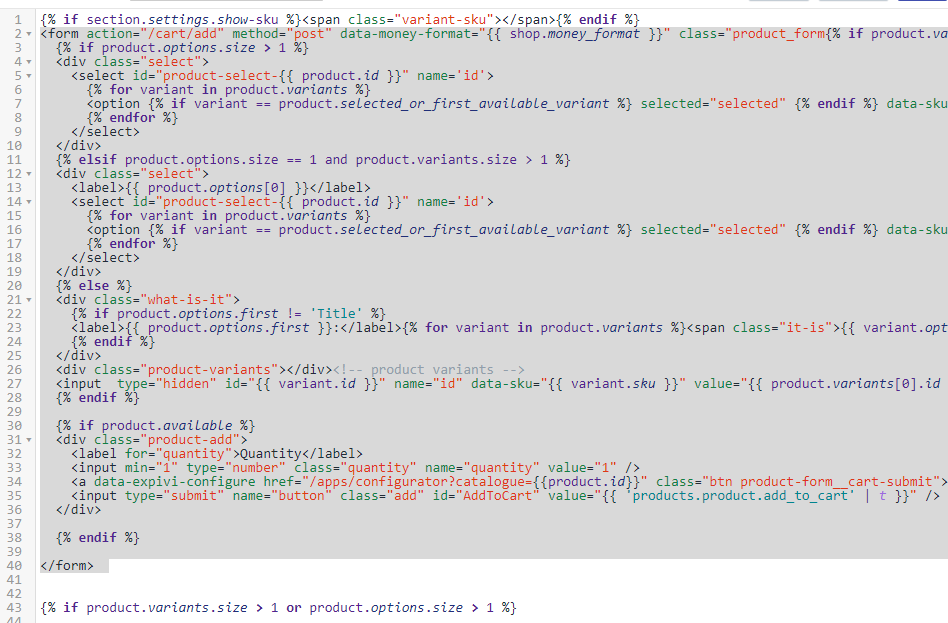
{% if product.type != "Customizable Sneaker"%}
<!-- PUT THE ORIGINAL ADD TO CART FORM/BUTTON IN HERE -->
{% else %}
<a href="/apps/configurator?catalogue={{product.id}}&currency={{cart.currency.iso_code}}&locale={{request.locale.iso_code}}"
class="btn product-form__cart-submit">
Configure</a>
{% endif %}Note: “Customizable Sneaker” is being used here as an example. Replace this with the correct product type you’ve created earlier.
Note: To have the “Configure” button look to same as the original “Add to cart” button, use the same CSS classes and selectors or copy the CSS code from the original button and apply it to the new “Configure” button.
Locate the file where the original “Add to cart” form or button is located and add this code to this file.
Don’t forget to click “Save” to save the modifications.
Note: the images below are examples, it may differ from your theme files.
Before:
After:
4.2 Adding product configuration information to the shopping cart
Next step we’ll be adding some extra product configuration information next to the product thumbnail in the shopping cart.
Note: location and names of the template files may differ in your own template.
Under the Sections section, find and open the cart-template.liquid file.
Find the line with
{% for item in cart.items %}
(on the image below it’s on line 17) and copy and paste the following code right below this line:
{%- assign property_size = item.properties | size -%}
{%- assign configuration_image = 0 -%}
The code will look like this:

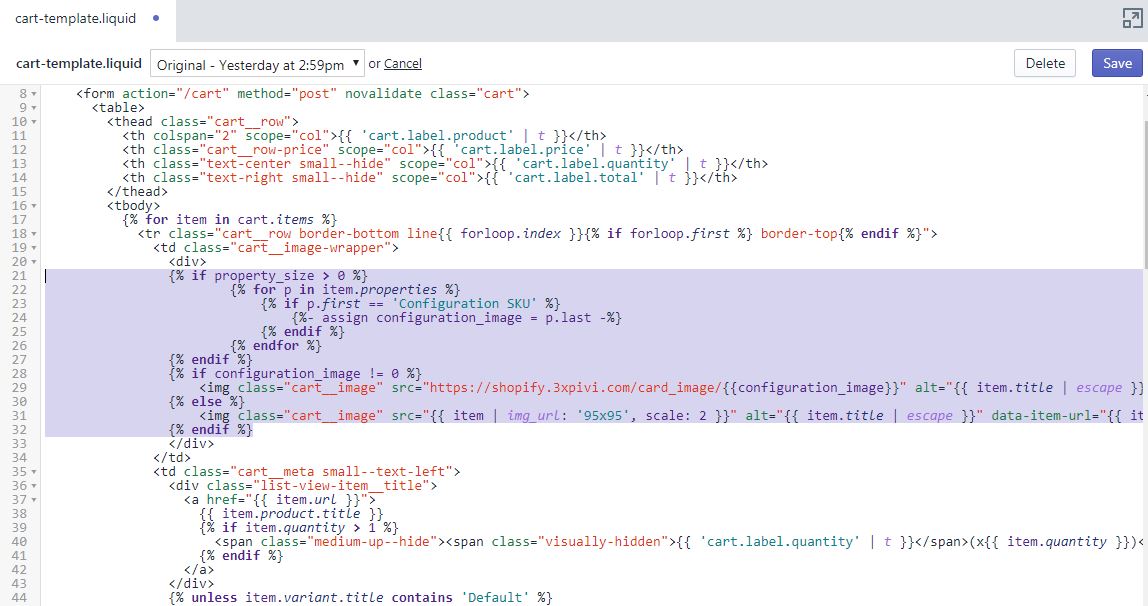
Now we’re going to replace the original thumbnail code with new thumbnail code with some extra information. Locate the following line of code:
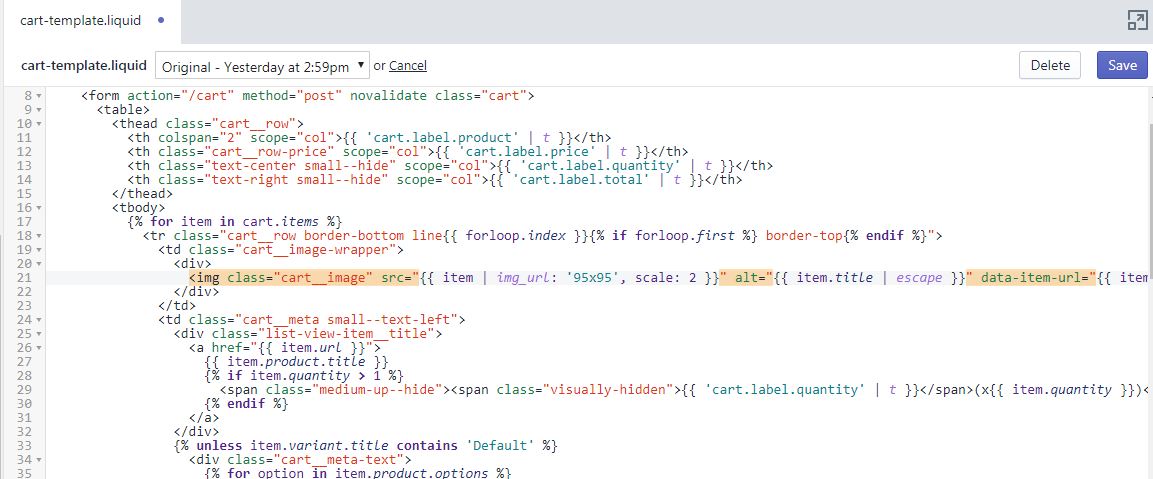
And replace it with the following code:
{% if property_size > 0 %}
  {% for p in item.properties %}
    {% if p.first == 'Configuration SKU' %}
      {%- assign configuration_image = p.last -%}
    {% endif %}
  {% endfor %}
{% endif %}
{% if configuration_image != 0 %}
  <img class="cart__image" src="https://app-spf.expivi.com/card_image/{{configuration_image}}" alt="{{ item.title | escape }}" data-item-url="https://app-spf.expivi.com/card_image/{{ configuration_image }}">
{% else %}
  <img class="cart__image" src="{{ item | img_url: '95x95', scale: 2 }}" alt="{{ item.title | escape }}" data-item-url="{{ item.url }}">
{% endif %}
The code will look like this:
Don’t forget to click “Save” and you’ve integrated Expivi with your Shopify storefront!
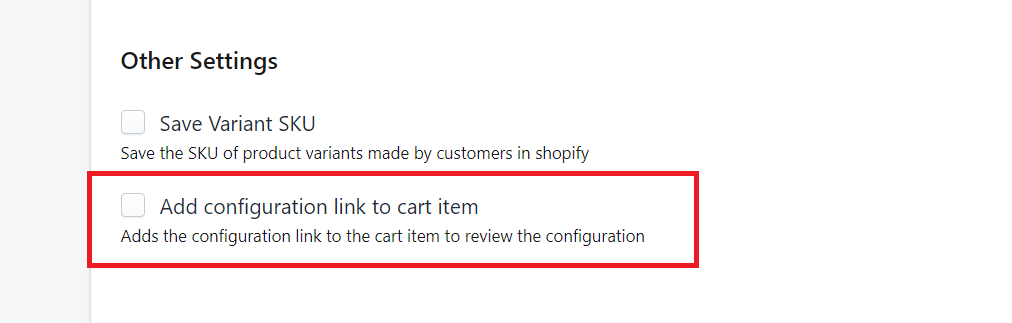
4.3 Add a reconfiguration link to the cart
If you want to allow customers to be able to change their selected options once an Expivi product has been added to the shopping cart, then you can add a “reconfiguration link” to each product in the shopping cart.
To enable this option, go to the app settings of the Expivi app (Apps > Expivi 3D Customization). Under “Other Settings” check the box next to “Add configuration link to cart item” to enable this and click on the “Save” button.
It is necessary to add custom code to the theme files, so that the link will appear in the shopping cart. For the default Shopify theme, open cart-template.liquid and scroll to line 91 where you’ll find the lines with <span data-cart-item-property-value>. Replace the code with the following lines:
<span data-cart-item-property-value>
{%- if p.last contains '/uploads/' -%}
<a href="{{ p.last }}" data-role="product-upload">{{ p.last | split: '/' | last }}</a>
{%- else -%}
{%- if p.first == "Configuration Link" -%}
<a href="https://{{p.last}}">Change chosen options</a>
{% else %}
{{ p.last }}
{%- endif -%}
{%- endif -%}
</span>
Note: other themes might have there own template structure, so the code for the cart items might be in a different file other than the one mentioned here.
The shopping cart will now look like this:
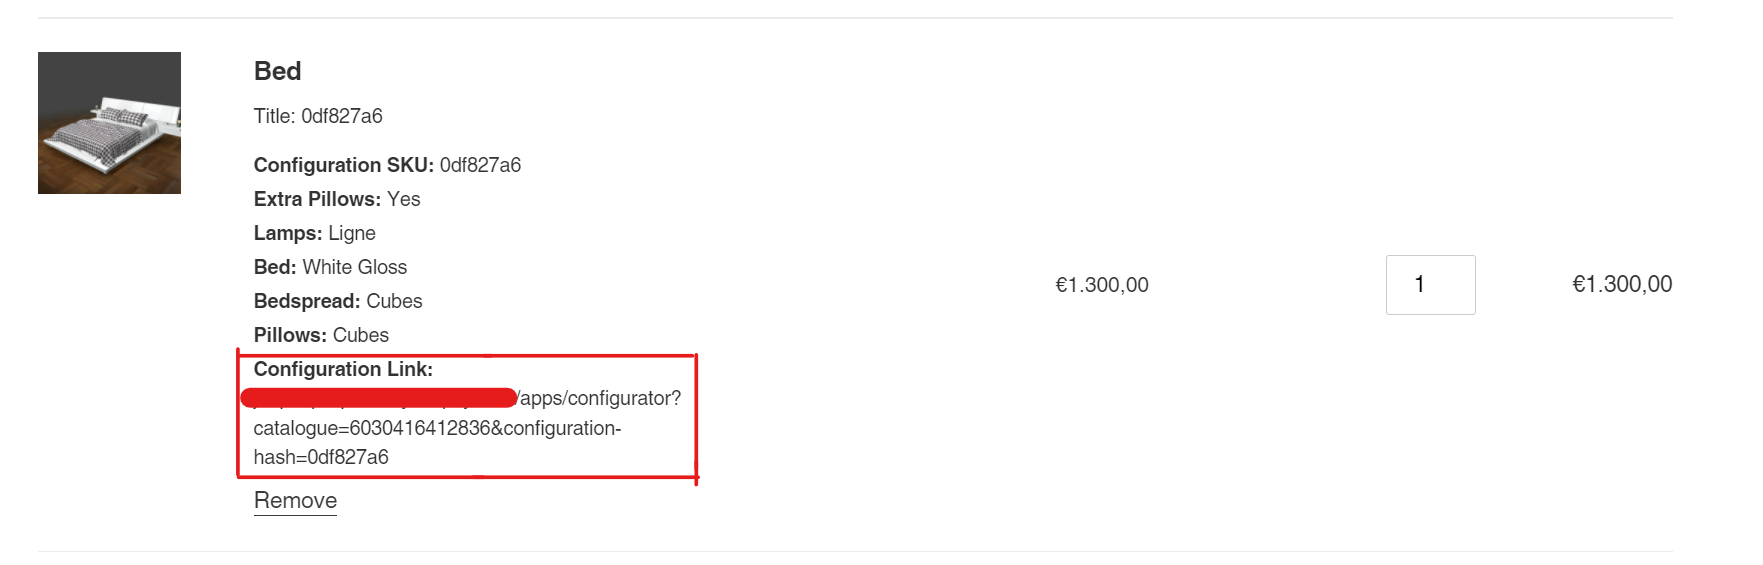
Note: Whenever a customer reconfigures a product in the cart, the reconfigured product will be added as a new product to the cart and will not replace the original configured product.
5. Fonts
When using the text_to_image attribute for product configuration, you can assign fonts to be selectable.
The fonts are provided by fonts.google.com
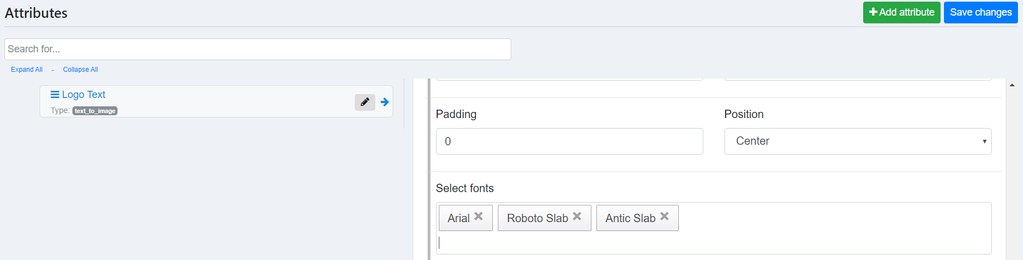
To be able to use these fonts in the Shopify storefront, an addition to the stylesheet has to be made. As seen in the image above two fonts are added in addition to the system font “Arial”. To load these fonts in the Shopify storefront, the google provided stylesheet url must be added to the stylesheet of the theme.
Warning: It is also possible to add a custom font. In this case the same changes apply, however the stylesheet url must be provided by yourself.
Info: If the Shopify theme already uses the same fonts, no actions are needed and this part can be skipped.
For example:
<link href="https://fonts.googleapis.com/css?family=Antic+Slab|Roboto+Slab&display=swap" rel="stylesheet">Find “theme.liquid” in the Theme files (See 4. Add custom code to Shopify template) and find the line:
<link rel="canonical" href="{{ canonical_url }}">
Add the google provided stylesheet url underneath this line.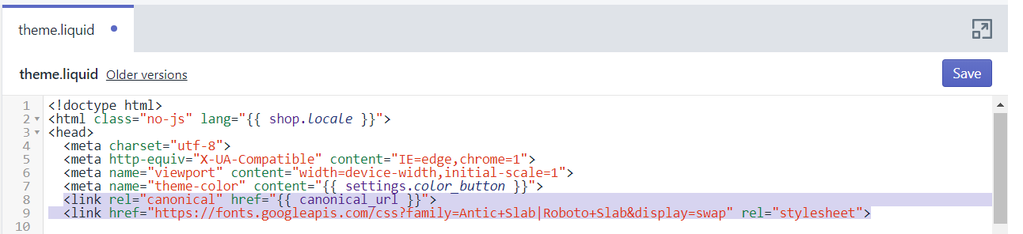
Press “Save” to store the changes, and you’re done!
Fixing uploaded image link in order details
If you’re using Expivi’s image upload feature for your 3D products, you’ll see a link to the uploaded image in the order details.
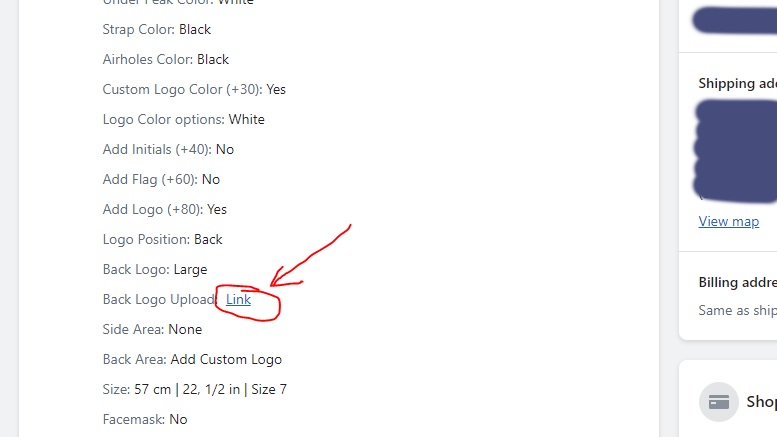
Unfortunately, this will lead to a broken link, because parameters are added to the image URL, so we need to add custom code to strip these parameters, so that the image URL will work again.

Make sure the following JS code is added to the page with Expivi’s 3D configurator on it.
function saveConfiguration() {
    return expivi.saveConfiguration(512, 512);
}

function createVariant(savedBundle) {
    return new Promise(function (resolve, reject) {
        $.ajax({
            type: 'POST',
            url: '/apps/configurator',
            data: JSON.stringify({
                configuration: savedBundle.configured_products,
                productId: shopifyProductId
            }),
            contentType: 'application/json; charset=utf-8',
            dataType: 'json',
        }).done(function(createResult) {
            createResult.configuredProduct = savedBundle.configured_products[0];
            resolve(createResult);
        }).fail(reject);
    });
}

function fixLinkAttributes(createResult) {
    var matchParameters = /(.*)\s(?:@offset:)(.*)(?:;).*(?:@rotation:)(.*)(?:;).*(?:@scale:)(.*)(?:;)/i;
    var optionKeys = Object.keys(createResult.options);
    optionKeys.forEach(function(key) {
        var value = createResult.options[key];
        if (!/.*(@offset).*(@rotation).*(@scale)/.test(value)) {
            return;
        }

        var matches = value.match(matchParameters);
        matchParameters.lastIndex = 0;
        if (matches.length === 5) {
            createResult.options[key] = matches[1];
            createResult.options['_' + key + '_offset'] = matches[2];
            createResult.options['_' + key + '_rotation'] = matches[3];
            createResult.options['_' + key + '_scale'] = matches[4];
        }
    });
    return createResult;
}

function addToCart(createResult) {
    return new Promise(function (resolve, reject) {
        let addJsResponse = {
            quantity: 1,
            id: createResult.variant_id,
            properties: createResult.options,
        };

        $.ajax({
            type: 'POST',
            url: '/cart/add.js',
            data: JSON.stringify(addJsResponse),
            contentType: 'application/json; charset=utf-8',
            dataType: 'json',
        }).done(resolve).fail(reject);
    });
}

window.xpv_hooks_add_to_cart = function(context, event) {
    $button = $(context);
    shopifyProductId = $button.data('productId');

    // Disable button
    if ($button[0].hasAttribute('disabled')) {
        return false;
    }
    event.preventDefault();
    $button.attr('disabled', 'disabled');
    $button.addClass('loading');

    return Promise.resolve()
        .then(function() {
            return saveConfiguration();
        })
        .then(function(result) {
            return createVariant(result);
        })
        .then(function(results) {
            return fixLinkAttributes(results);
        })
        .then(function(result) {
            return addToCart(result)
        })
        .then(function() {
            if ($button.data('url') !== 'NONE') {
                window.location.href = $button.data('url');
            }

            // Don't let expivi handle add to cart
            return false;
        })
        .catch(function (error) {
            $button.removeAttr('disabled');
            $button.removeClass('loading');
            throw error;
        });
}