Table of Contents
Getting ready
You will need to have an account on Expivi before you start.
To get your Expivi account ready, please head to www.expivi.com and request yours now.
This document also assumes that your Shopify store and products have already been set up.
Creating Expivi products
- Prepare the products you want to connect on Expivi.
- Expivi offers many customization and configuration possibilities.
- To learn more about how to setup your products inside Expivi, head to our Youtube channel.
How to integrate Expivi viewer and options embedded within a Shopify theme product page.
To integrate the Expivi viewer and the options within a Shopify theme product page you need to do the following 6 steps.
- Follow the steps 1-3 as described in this Shopify integration document
- Add
HTMLtags to thetheme.liquid - Copy
expivi-embeddedcode into your theme. - Add Metafields Guru plugin to your theme.
- Add metafield to Shopify product to connect Expivi product.
- Change your
product-template.liquidto include the newexpivi-embedded.liquidcode.
1. Follow the steps 1-3 as described in Shopify integration document
These steps explain how to setup the Expivi Shopify plugin that is required to integrate the embedded version of the Expivi viewer and options. Make sure to follow these steps carefully so you are prepared for the further steps.
2. Add HTML tags to the theme.liquid
Integrating Expivi with your Shopify storefront requires some modifications to the theme files of the theme you’re using for your Shopify storefront. If you have no knowledge to do this yourself, please ask a developer to do this for you.
Note: Be aware that each theme has its own unique code, so the instructions below should be used as an example.
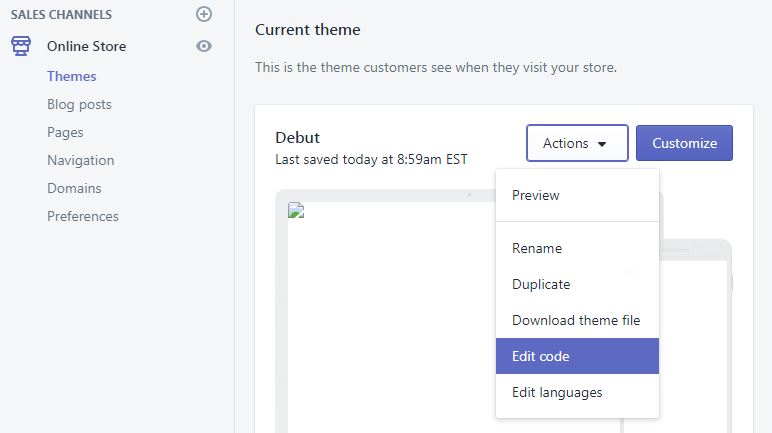
Go to Online Store > Themes and select Edit code in the Actions drop down menu. You’ll be taken to the template files editor.

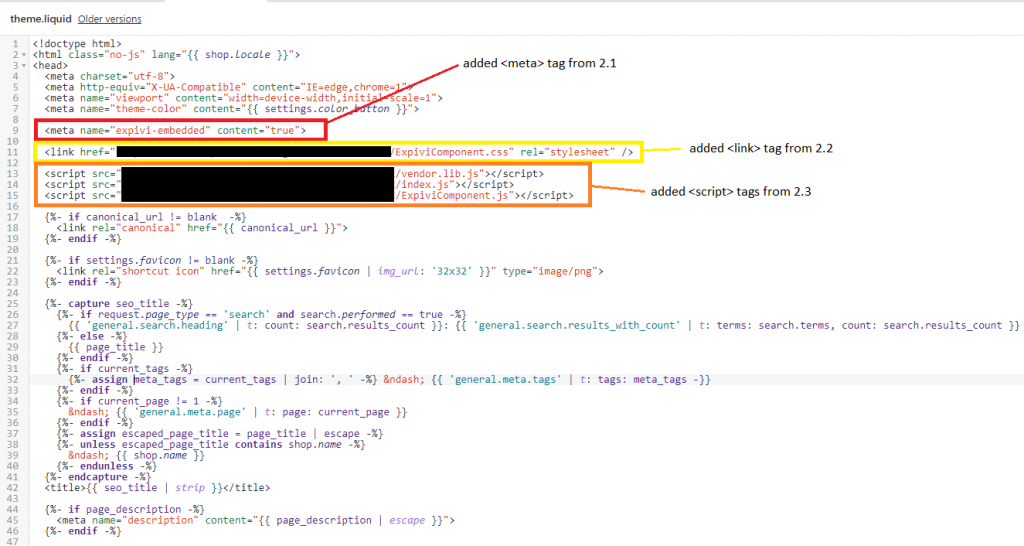
In order to have the Expivi configurator function properly, a few scripts need to be added to the <head> tag in your theme.liquid file.
2.1 adding the <meta> tag
Firstly, a meta tag needs to be added to tell the Expivi plugin that you are using the embedded version, by adding the following line.
<meta name="expivi-embedded" content="true">2.2 adding the <link> tag
Secondly you need to add the style of the ExpiviComponent by adding the next line:
Replace {api_asset_url} in the following code snippets with the provided asset URL that you got from the Expivi support team.
<link href="https://assets.expivi.net/options/latest/css/app.css" rel="stylesheet" />2.3 adding the <script> tags
Lastly, some scripts need to be added to make the Expivi configurator function properly. These script also need to be added to the <head> tag.
<script src="https://assets.expivi.net/viewer/latest/viewer.js"></script>
<script src="https://assets.expivi.net/options/latest/js/app.js"></script>
After you have done this, your theme.liquid should look like something like this:
3. Copy Expivi-embedded code into your theme.
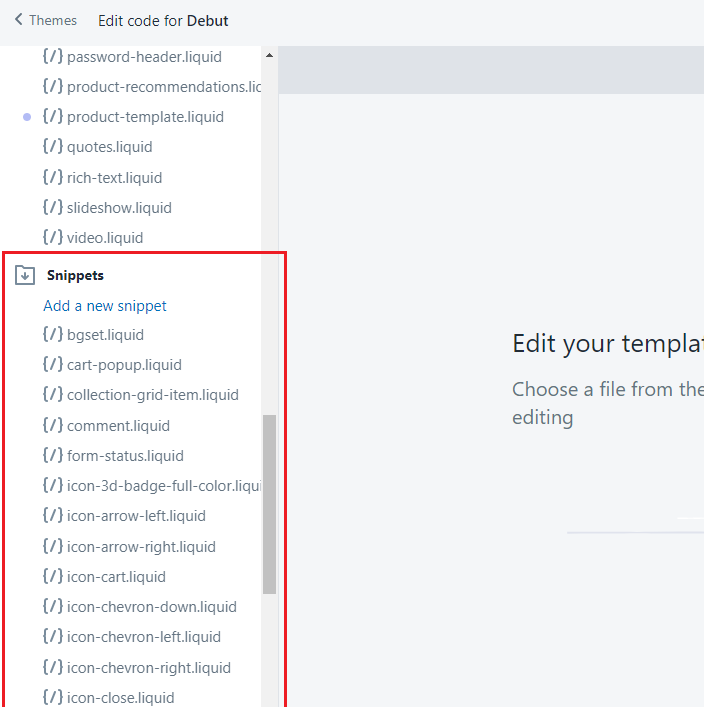
To add the Expivi 3D configurator to your product page you need to add a new file to your theme. This file needs to be named expivi-embedded.liquid added to the snippets folder. You can do this by following the following steps:
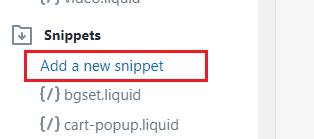
3.1 Go to your theme file explorer ‘snippets’ folder
3.2 Click on ‘add a new snippet
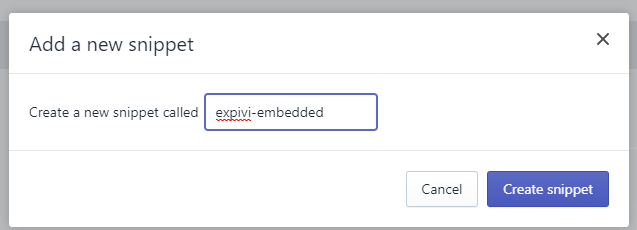
3.3 Enter the name ‘expivi-embedded’ and press ‘Create snippet’.
Afterwards you need to copy the following code to the newly created file.
Replace {api_key} in the following code snippet on line 61 with the API key that you generated from the Expivi backend (https://admin.expivi.net/). It should also be sitting in the ‘API key’ input field on the Expivi shopify plugin.
<div class="expivi-single-product-container">
  <div class="expivi-viewer-container">
    <div id="viewerContainer"></div>
  </div>
  <div class="expivi-option-container">
    <div id="priceContainer"></div>
    <div id="optionsContainer"></div>
  </div>
</div>
<div>
  <button class="btn expivi-add-to-cart" id="embedded-add-to-cart-btn" data-product-id="{{ product.id }}" data-url="/cart" data-expivi-save>
    Add to cart
  </button>
</div>

<style>
	.expivi-single-product-container {
    	display: table;
		height: 500px;
		width: 100%;
    }
    .expivi-single-product-container .expivi-viewer-container {
		display: table-cell;
		width: 64%;
		padding-right: 15px;
		vertical-align: top;
	}
	.expivi-single-product-container .expivi-viewer-container #viewerContainer {
      	display: block;
      	width:100%;
      	height:100%;
      	min-height: 100%;
    }
    .expivi-single-product-container .expivi-option-container {
		height: 100%;
      	display: table-cell;
      	width: 36%;
    }
    .expivi-add-to-cart {
      float: right;
    }
    @media (max-width: 600px) {
      .expivi-single-product-container {
        display: block;
        height: unset;
      }
      .expivi-single-product-container .expivi-viewer-container {
        display: block;
        width: 100%;
        padding-right: 0;
        height: 50vh;
      }
      .expivi-single-product-container .expivi-option-container {
        height: initial;
        display: block;
        width: 100%;
      }
    }
</style>
<script type="text/javascript">
  var apiToken = '{api_key}';
      window.expiviInstance = ExpiviComponent({
        catalogueId: {{product.metafields.expivi.product_id}},
        viewerContainer: "#viewerContainer",
        optionContainer: "#optionsContainer",
        priceSelectors: '#priceContainer',
        token: apiToken
  });
</script>
4. Add Metafields Guru plugin to your theme.
If you already have ‘Metafields Guru’ added to your theme you can skip this step.
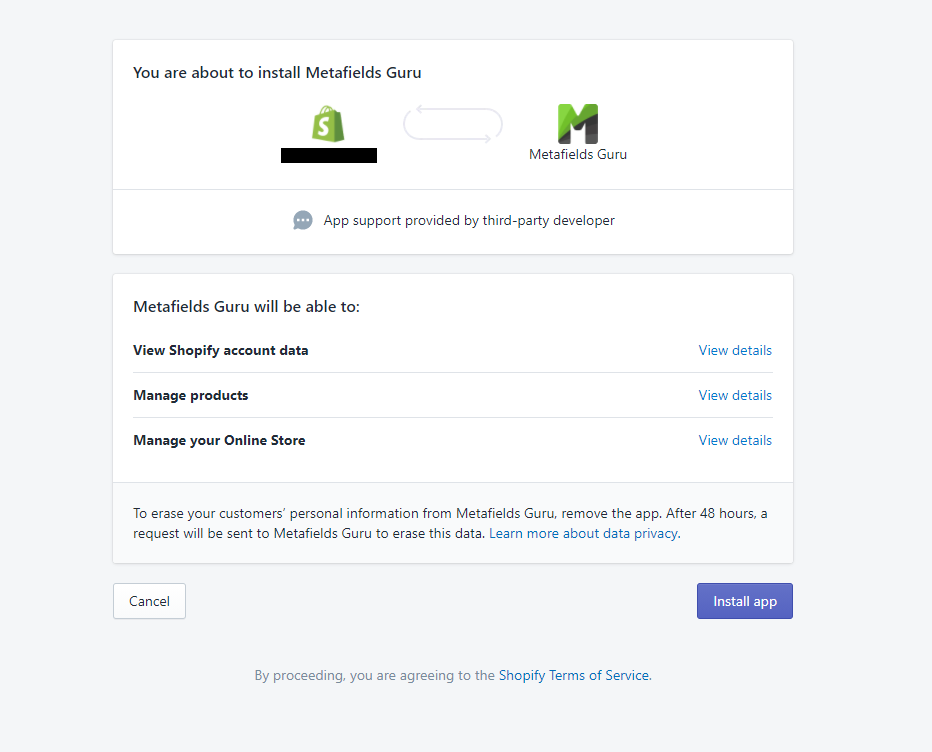
Go to https://apps.shopify.com/metafields-editor-2 and click ‘Add app’. If you are not yet logged into the shopify app store, there will be a prompt to login. Please login and afterwards you will be met with the page below. Press install app to add the Metafields Guru plugin to your theme. In the next step you will setup this plugin for the Expivi 3D configurator.
5. Add metafield to Shopify product to connect Expivi product.
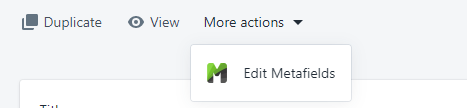
Navigate to your Shopify product that you connected with an Expivi product in step 3 of Shopify integration document. Under the ‘More actions’ dropdown you will find an option that says ‘Edit Metafields’.
Once you click on that you can add a new metafield to this product by clicking ‘Create Metafield’. This is necessary for the distinguishment between an Expivi 3D configurator on the product page or a standard visualization on the product page.
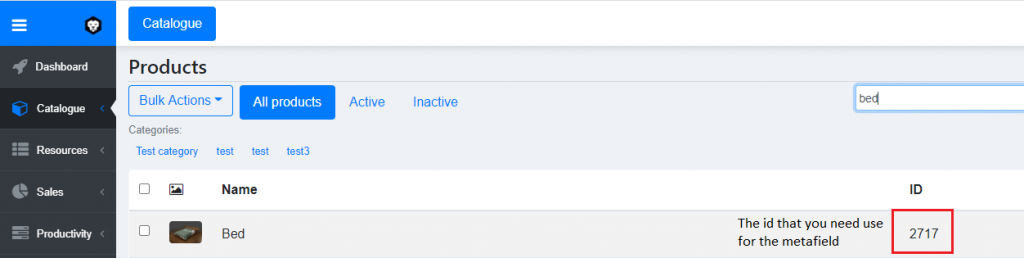
create the new metafield as follows. Make sure that the key is called ‘product_id’ (the underscore between product and id is mandatory). Fill in ‘Expivi’ as the namespace. As for the actual value, you want to use the ID that is in the Expivi backend. You can find this under Catalogue in the table as seen in the picture below.
Eventually, when you have filled everything in, it would look something like this:
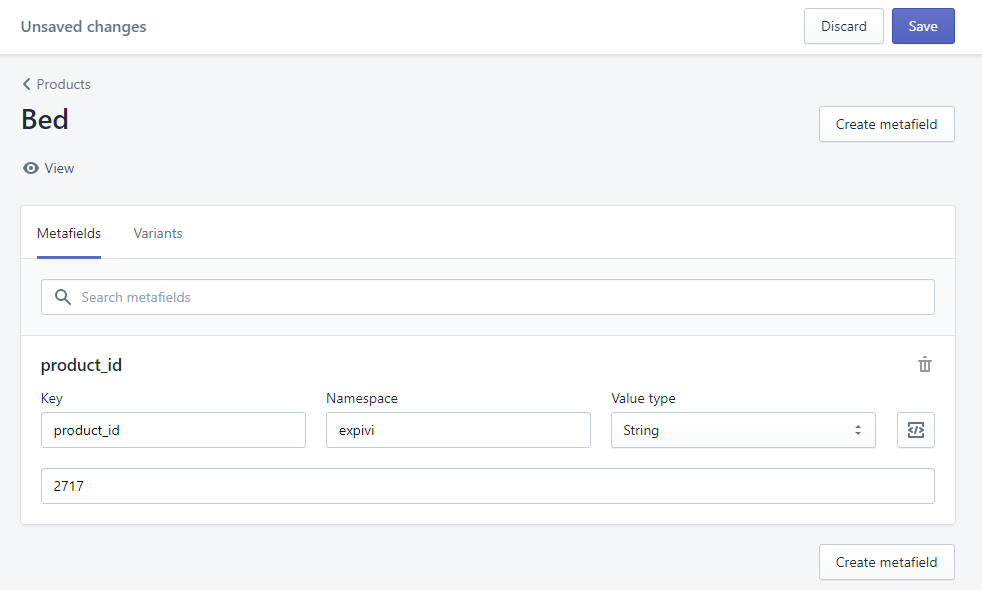
Don’t forget to save your changes by pressing the save button displayed above.
6. Change your product-template.liquid to include the new expivi-embedded.liquid code
This following change is very dependent on your theme and can look a little different compared to the example. We need to add a check on the product page to see if we should load the embedded Expivi 3D configurator or if we should show the standard visualization.
The code looks like this:
{% if product.metafields.expivi.product_id %}
  {% include 'expivi-embedded' %}
  <div hidden style="display:none!important;">
{% else %}

  <!-- PUT THE ORIGINAL PRODUCT PAGE HTML HERE -->

{% if product.metafields.expivi.product_id %}
  </div>
{% endif %}
Depending on how you implement it, it would result in the following:
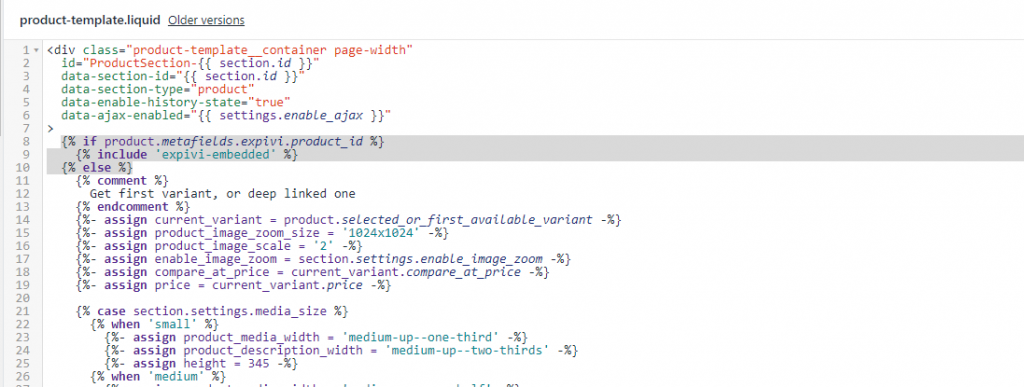
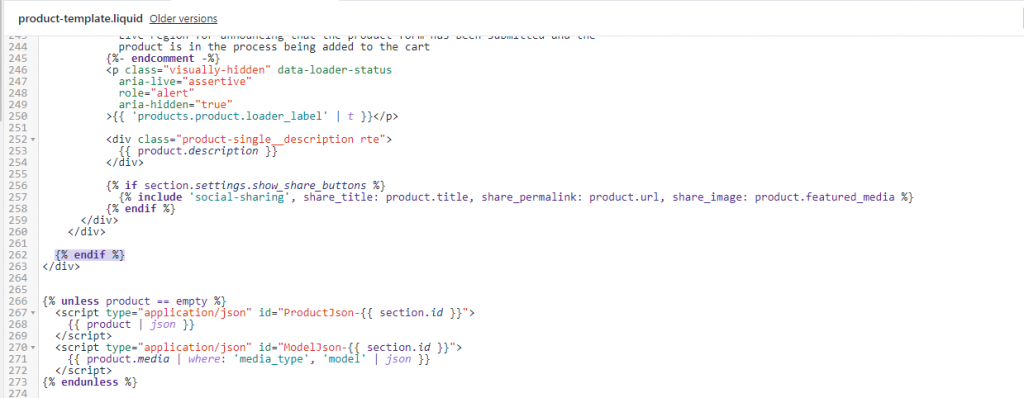
As you can seen in the images above the first part of the code is there from line 8 until line 10. After that the standard visualization is implemented. The last part of the code ( the {% endif %}) is put on line 262 after the implementation of the standard visualization.
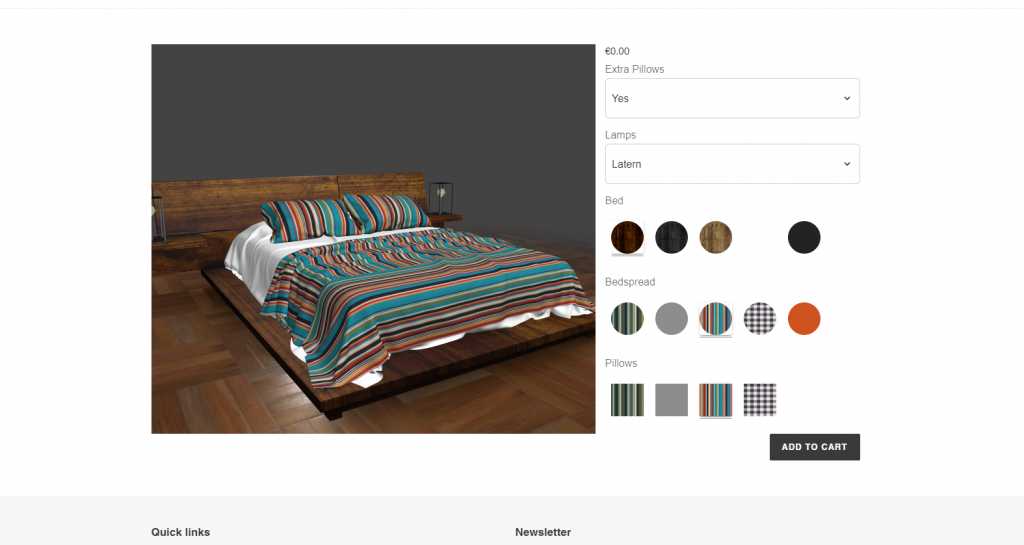
The result
If you have done everything according to these steps you should see an embedded viewer of the product that you have connected on that product page. It will look like something like this:
Well done!
You’ve successfully integrated the Expivi 3D configurator in your Shopify store!
7. Add custom code to Shopify template
Integrating Expivi with your Shopify storefront requires some modifications to the theme files of the theme you’re using for your Shopify storefront. If you have no knowledge to do this yourself, please ask a developer to do this for you.
Be aware that each theme has its own unique code, so the instructions below should be used as an example.
Go to Online Store > Themes and select Edit code in the Actions drop down menu. You’ll be taken to the template files editor.
7.1 Adding product configuration information to the shopping cart
Next step we’ll be adding some extra product configuration information next to the product thumbnail in the shopping cart.
Note: location and names of the template files may differ in your own template.
Under the Sections section, find and open the cart-template.liquid file.
Find the line with
{% for item in cart.items %}
(on the image below it’s on line 17) and copy and paste the following code right below this line:
{%- assign property_size = item.properties | size -%}
{%- assign configuration_image = 0 -%}
The code will look like this:

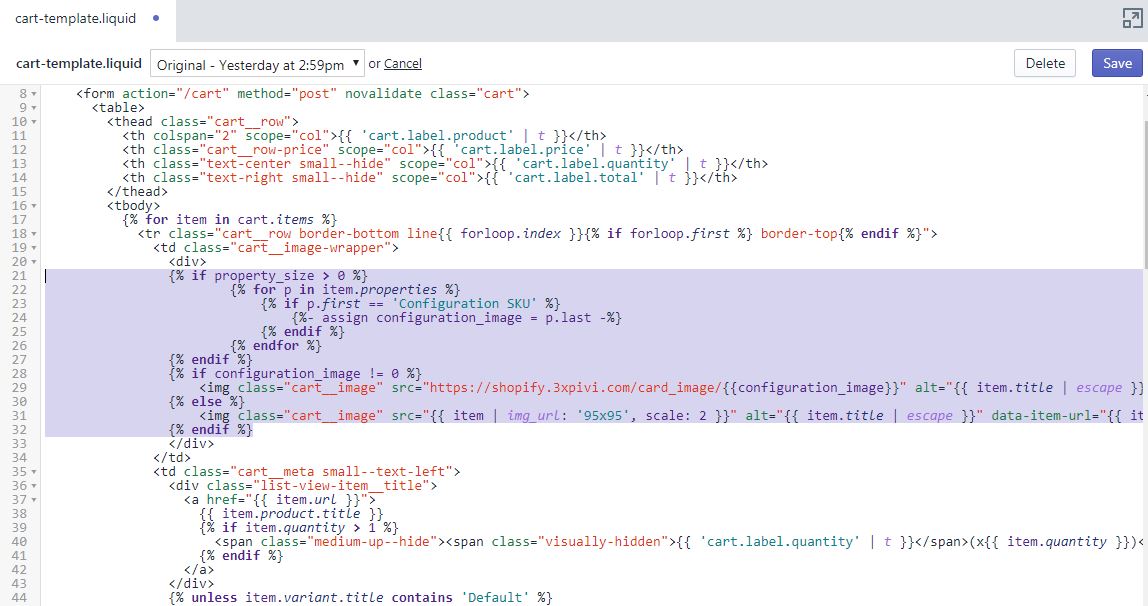
Now we’re going to replace the original thumbnail code with new thumbnail code with some extra information. Locate the following line of code:
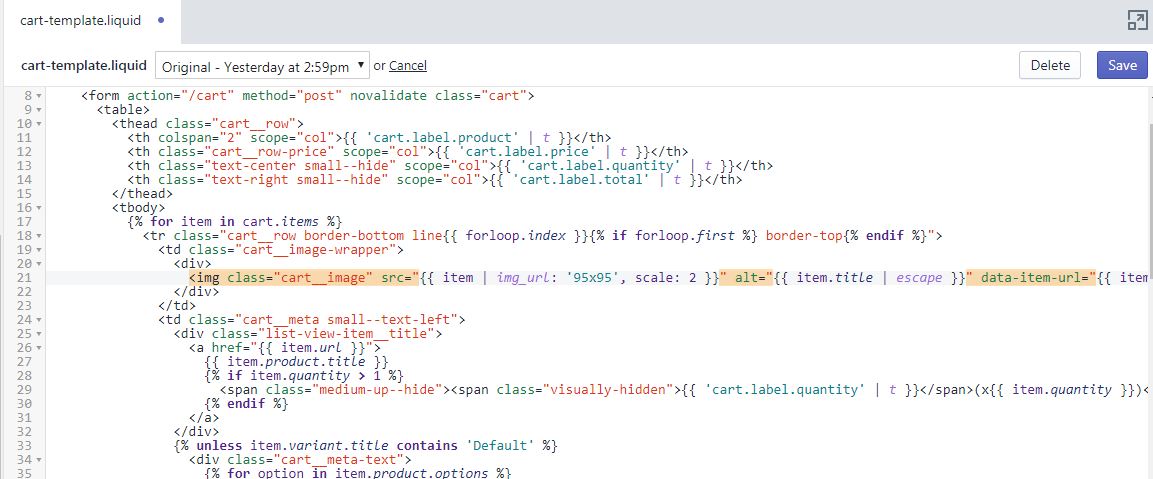
And replace it with the following code:
{% if property_size > 0 %}
  {% for p in item.properties %}
    {% if p.first == 'Configuration SKU' %}
      {%- assign configuration_image = p.last -%}
    {% endif %}
  {% endfor %}
{% endif %}
{% if configuration_image != 0 %}
  <img class="cart__image" src="https://app-spf.expivi.com/card_image/{{configuration_image}}" alt="{{ item.title | escape }}" data-item-url="https://app-spf.expivi.com/card_image/{{ configuration_image }}">
{% else %}
  <img class="cart__image" src="{{ item | img_url: '95x95', scale: 2 }}" alt="{{ item.title | escape }}" data-item-url="{{ item.url }}">
{% endif %}
The code will look like this:
Don’t forget to click “Save” and you’ve integrated Expivi with your Shopify storefront!
7.2 Add a reconfiguration link to the cart
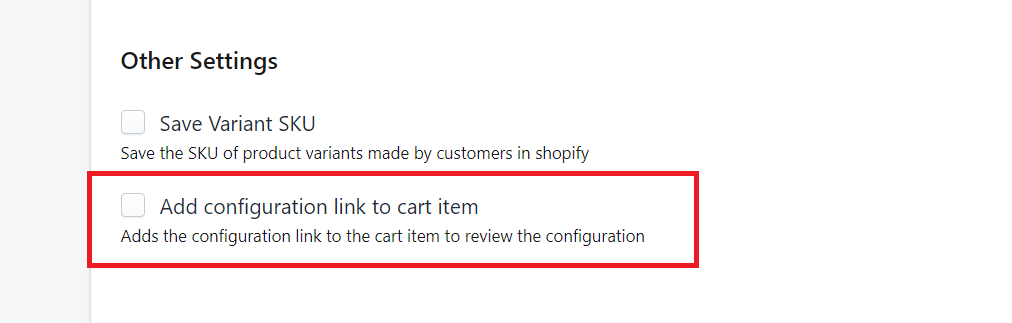
If you want to allow customers to be able to change their selected options once an Expivi product has been added to the shopping cart, then you can add a “reconfiguration link” to each product in the shopping cart.
To enable this option, go to the app settings of the Expivi app (Apps > Expivi 3D Customization). Under “Other Settings” check the box next to “Add configuration link to cart item” to enable this and click on the “Save” button.
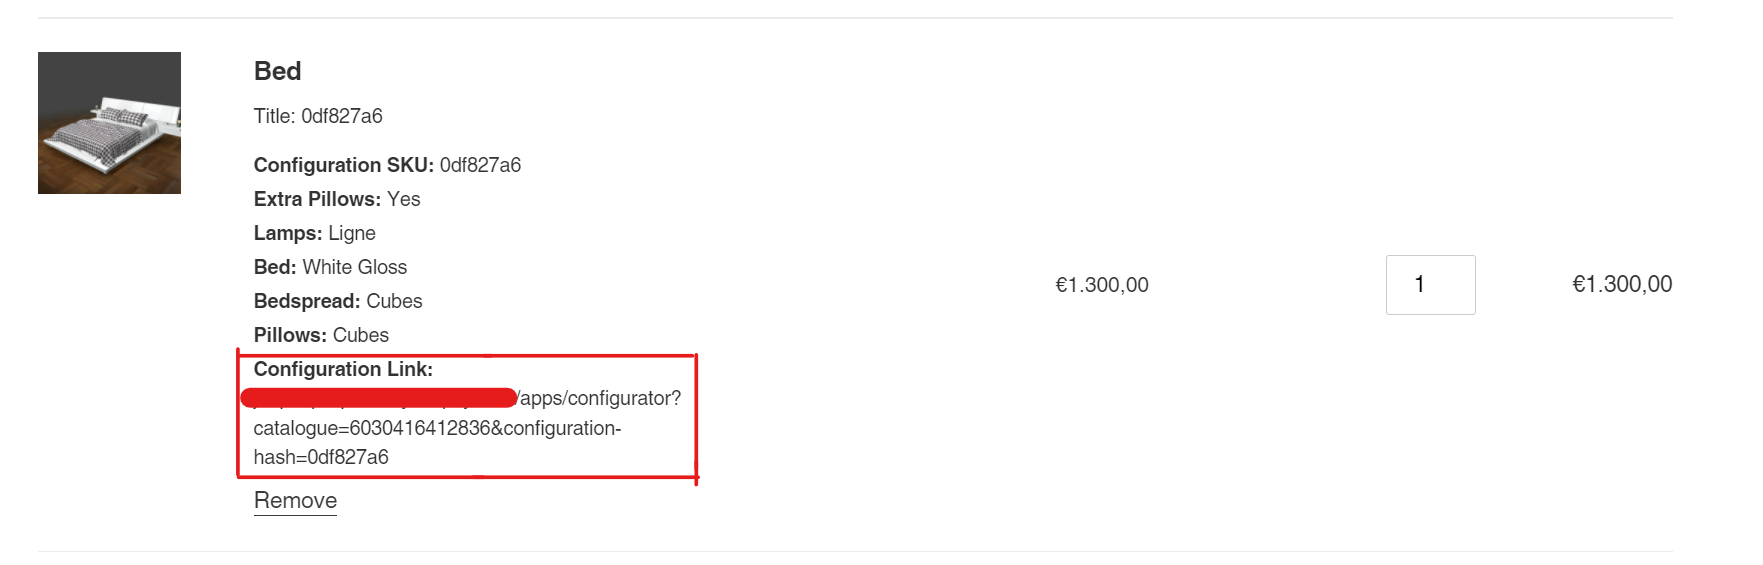
It is necessary to add custom code to the theme files, so that the link will appear in the shopping cart. For the default Shopify theme, open cart-template.liquid and scroll to line 91 where you’ll find the lines with <span data-cart-item-property-value>. Replace the code with the following lines:
<span data-cart-item-property-value>
{%- if p.last contains '/uploads/' -%}
<a href="{{ p.last }}" data-role="product-upload">{{ p.last | split: '/' | last }}</a>
{%- else -%}
{%- if p.first == "Configuration Link" -%}
<a href="https://{{p.last}}">Change chosen options</a>
{% else %}
{{ p.last }}
{%- endif -%}
{%- endif -%}
</span>
Note: other themes might have there own template structure, so the code for the cart items might be in a different file other than the one mentioned here.
The shopping cart will now look like this:
Note: Whenever a customer reconfigures a product in the cart, the reconfigured product will be added as a new product to the cart and will not replace the original configured product.