Table of Contents
E-Commerce extension
Introduction
Expivi’s 3D CPQ solution allows the customer to view the product in 360 and AR, enriching the customer experience by allowing them to view the product from every angle and even in their own space, bringing the retail experience to online. The personalization and configuration solution of Expivi builds on top of the 3D visualization to help the customers understand the product options, such as colors, variations or add-ons. These comes with real-time price calculation and instant quotation allowing the customers to make an informed decision resulting in happier customer and more sales for e-commerce channels.
This document
Expivi is a SaaS solution with headless APIs, allowing the third-party solutions to integrate her 3D CPQ capabilities, enriching the integrating solution’s capabilities and their customer’s experience.
This document describes the integration process and data flow of Expivi into third-party solutions.
Integration overview
Expivi provides the backoffice to setup and support the 3D CPQ for products. As such any data with relation to 3D visualization and Configuration has to be defined and live within Expivi. While Expivi can also fully support the Pricing and Quotation, this information can also reside in third-party’s solution.
The configurable product on Expivi then is served on the third party solution as an embedded solution, which visualizes the product in 3D and provides the personalization capability on the desired page.
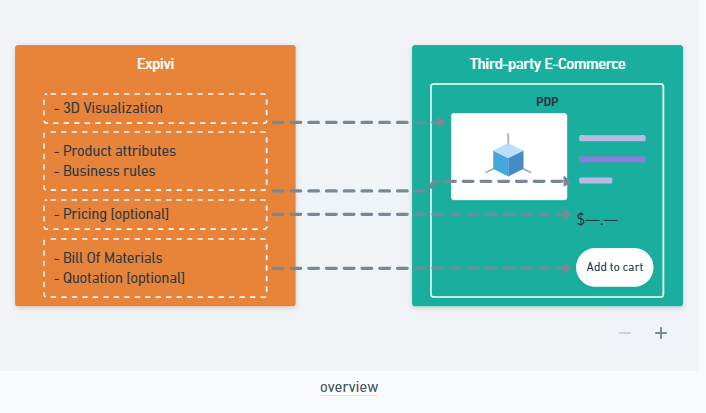
The order processing then happens on the integrating solution with quotation data provided from Expivi including:
- Pricing data
- Bill of Materials
- Product attributes & specifications
- Reconfiguration data.
Integration flow
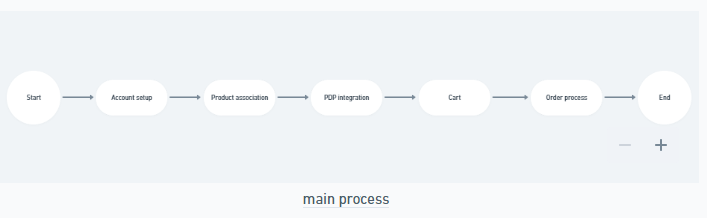
The above process flow illustrates the main parts required for integrating Expivi into third-party solutions.
- Account setup: Provide Expivi’s account information such as API Token needed to use Expivi on third-party solution.
- Product association: The setup of Expivi’s product data which should embedded on third-parties PDP.
- PDP integration: Embedding Expivi’s 3D CPQ.
- Cart: Handling the Expivi’s output to create an item order in Cart.
- Order process: Processing the Expivi’s generated data in orders and order handling connected solutions such as ERPs.
Account setup
The integrating should provide a setup page to setup the user’s Expivi account information and preferences.

Required fields
The following fields are always required by Expivi to work. These information should always be requested and persisted in the integrating solution in order to use Expivi’s APIs and libraries.
- API Token: The user’s Expivi api token to authenticate and access the Expivi’s account & product data.
Optional fields
Depending on the level of integration, additional fields could be needed to save the user’s preferences. This information are mainly in relation to PDP and Cart integration preferences, studying the subsequent processes and the result of integration effort determines the further needed preference fields.
Example of such preferences are:
- HTML Element selectors: Expivi’s embed library injects the 3D viewer and other elements such as options and price into the provided html elements.
- PDP CTA: Whether the customer will add a product to cart or will request a quotation.
- Cart success redirect page: Which page should the customer be nagivated to after a product is added to the cart.
Product association
In order to show the Expivi’s configurable product on a specific product page, on integrating e-commerce solution, a relation is necessary to identify which product page on the integrating solution should view the Expivi’s configurable product.
The Expivi’s configurable product might be considered a master product with many variations. On a webshop system it is often the case to have a simple product represent the Expivi’s master product. Meaning the PDP of the simple product is the landing page for the Expivi’s master product which contains all the variations on the same page.
Note: the product association in here should not be confused with the variation or the configured product that will end up in the order line.
Associating products
The integrating solution should provide the necessary settings to associate an Expivi product to PDP which should represent the configurable product.

Required fields
- Master product id: Expivi’s configurator uses this id to load the master product with all the variations.

Note: the integration may provide a visual way to select the associated Expivi master product id instead of a plain number field. The authentication token provided in the Account setup settings can be used to query Expivi’s REST API.
The list of all Expivi’s products can be retrieved using the REST endpoint:
GET expivi.net/api/catalogue
Authentication: Bearer token
- Preset id: Additional to master product id, it is possible to provide a preset id which represents a specific variation of the product. This field can be used to associate a specific PDP page with a specific variation of the configurable product.

Optional fields
Depending on the level of integration and the decisions on the Cart and Order handling, additional fields might be needed to persist the user’s preferences.
Example of some of the optional fields might be:
- Expivi viewer preferences: Show 3D Hover icon, Auto rotate product on start, Show progress bar. These preferences can be provided to Expivi’s viewer library.
- User action: add to cart or quotation request.
- Order type:
- Custom product: add the simple product to cart with user’s selected attributes as custom order attributes.
- Variation: depending the customer selected attribute, find the corresponding product variation on the integrating solution and add the product variation to the cart.
- Bundled product: Based on the Bill Of Materials of the configured product, create a bundle of sub-products and add the bundle to the cart.
Order type: Implementation detail about the order type will be provided in the Cart section.
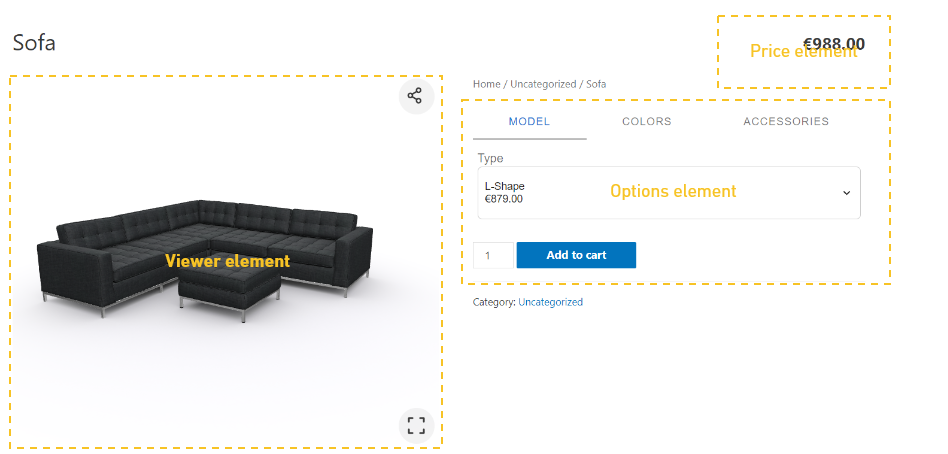
PDP Integration (Product Detail Page)
Embedding
The detail on how Expivi can be embedded on an HTML page is provided on the following link: https://knowledge.expivi.com/knowledge-base/website-integration/expivi-website-integration/
Note: The responsiveness of the configurator is left to the integration as the PDP defines the layout and its responsiveness.
Styling
Expivi’s backoffice provides various visualizations for how the products attributes should be represented. Such visualizations include showing the product options inside a tab or a collapsible group, or otherwise if a product option should represented inside a list or as a dropdown.
The following document represent various visualization possibilities: https://drive.google.com/file/d/1tOAJIiYadjcYa6gqfzpQ69MqOElSw32f/view?usp=sharing
Further styling on the product options are left to the integration. A few examples of how much can be done through CSS can be found in following document: https://drive.google.com/file/d/1yzhJICwunT5-ukzTbMWYIIi1BaP0hRoF/view?usp=sharing
Cart integration
Requesting configured product information
The integrating solution should decide which action to provide to the customers on the PDP page. This can be requesting a quote or adding the configured product to the cart.
In any type of action, Expivi’s configurator provides the saveConfiguration method to generate a JSON including the following data:
- Thumbnail: base64 encoded thumbnail of configured product.
- Attributes: customer selected product specifications.
- Articles: Bill Of Materials of the configured product.
- Configuration: internal data used to start the configurator from a saved point.
Technical specification: can be found in the Serialization section of https://knowledge.expivi.com/knowledge-base/website-integration/expivi-website-integration/
Cart/Quote order item creation
The JSON data retrieved from Expivi configurator can be used to create an Cart order item or a quotation for the customer.
The integration may choose to provide one or more of the following implementations to create an order item:
- Simple product: Add a simple product to the cart with custom attributes retrieved from the ‘Attributes’ inside Expivi’s generated JSON data.
- Variation selection: Each Expivi attribute might contain a KEY value, which can be used to concatenate the customer selected attributes into a single variation code. For example given the customer has chosen Color RED and Size L, given the RED option would have the KEY R and the Size L would have the KEY L, the concatenation of the selected options might become: R-L which can represent the product variation SKU on the integrating solution. This allows the integrating solution to link the configured product to an existing product variation.
Requesting the attribute’s KEY: In order to include the KEY in the results of the JSON, the saveConfiguration method should request the keys using:
window.expivi.saveConfiguration(512, 512, 'ACTIVE_CAMERA', 'image/jpeg', {include_keys: true}).then(....)
- Product bundle: The generated JSON data also include ‘Articles’. This list includes the Bill Of Materials of the configured product. The integrating solution might choose to build a bundled product from the SKUs included in the BOM.
Note: Expivi makes it possible to have multiple products inside the same configuration. It is important to note that the generated JSON might contain more than just 1 configured product. In such case the integrating solution may choose to support such scenario.
Editing an Cart item
Given a configured product is added to the cart, the integrating solution may choose to support editing the cart item. To do so, the integrating solution should persist the generated JSON by Expivi from saveConfiguration method.
This JSON can be provided back to Expivi instantiation using the configuration parameter.
Technical specification: See the Constructor options section in https://knowledge.expivi.com/knowledge-base/website-integration/expivi-website-integration/
Order process
Once the cart’s order item is generated, the integrating solution is responsible for handling of its own Cart and the further order process.
There are however additional steps that can be taken to improve the business operations and as such enhance the integrating solution’s capabilities.
These steps include:
- ERP Communication: Given Expivi is able to provide the BOM of the configured product, the integrating solution might choose to add this additional data to the order item and communicate this data to connected ERP systems for inventory and production handling.
- Print ready files: Expivi enables Production On Demand for printing products. It does so by generating a print ready file which can be sent to printers directly, to print the customers illustrations on the configured product. To include the print ready file with the order, the integrating solution is required to make additional API calls to Expivi to retrieve the needed files.
Technical specification: on how to request the print ready file can be found in here: SVG – Exporting a Print Ready File-v7-20211215_130833