Table of Contents
Prerequisites
- Before we start on the WooCommerce Integration, it is important to have an Expivi account. You can register an account on: https://www.expivi.com/ or contact our sales team.
- A product in Expivi is required to follow the integration steps. Stuck on creating an Expivi product? Check out our knowledge base and YouTube channel!
- It is possible that our WooCommerce plugin is not fully compatible with custom product page layouts created with page builders like Elementor, Divi, etc.
Examples
The power of the Expivi 3D configurator lies within the easy and highly customizable integration with your WooCommerce webshop. While the out-of-the box integration method with the WooCommerce Expivi plugin already looks great, you can create the fantastic looking product pages with some CSS and JS (if needed) that fits your brand completely.
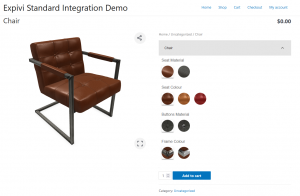
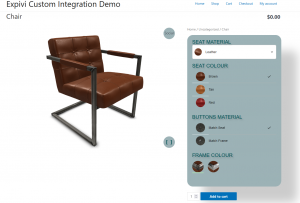
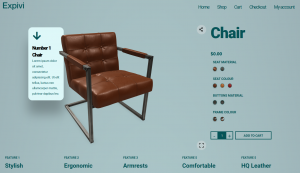
In these examples, you can have quick look what you can achieve with the out-of-the-box Expivi plugin (example 1), with some custom CSS styling (example 2) or with a lot of custom CSS, JS and page builders for WordPress (example 3).
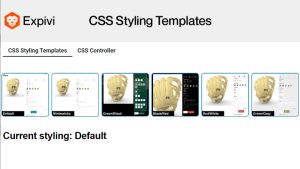
Extra examples with custom CSS code can be found here: https://customstyling.expivi.com/
Supported features overview table
| Features | Supported | How | Documentation |
| Presets | Yes | – | Create presets |
| Sticky viewer | Yes | CSS styling + coding | Sticky viewer |
| Download configuration PDF | Yes | WooCommerce Expivi plugin | Download configuration PDF |
| Request quote PDF | Yes | – | – |
| PDF invoice with full configuration | Yes | Third party plugin + custom coding | – |
| Social Media sharing | Yes | Standard Expivi feature | Social media sharing |
| Change viewer/options size | Yes | CSS styling | Change viewer |
| Easy order export (XML or CSV) | Yes | Third party plugin | Easy order export |
| SKU | Yes | Standard Expivi feature | SKU Basics |
| Attribute pricing | Yes | Standard Expivi feature | Attribute pricing |
| BOM | Yes | Standard Expivi feature | – |
Overview
Installing and integrating Expivi on your Store can be done in 4 simple steps:
- Install Expivi WordPress plugin on your website
- Creating an Access Token on Expivi to allow linkage of your Expivi account with your website
- Making the API connection on your store and linking with your account on Expivi system
- Connecting your WooCommerce product with your product on the Expivi system
How to integrate Expivi WordPress plugin
1. Installing the Expivi WordPress plugin for WooCommerce
Go to your WordPress admin page (https://WWW.YOURDOMAIN.COM/wp-admin) and navigate to Plugins > Add new now search for “Expivi” and install the plugin. Don’t forget to activate it.

2. Creating the Access Token
Login to the Backoffice of Expivi (https://admin.expivi.net/) and go to Team > API Keys. Create a new API key by clicking the “Create” button in the top right corner. A small pop-up box will appear. Give the API key a descriptive name and set the Role to “Viewer Token”, leave the host on “*”. Now click on “Create“.
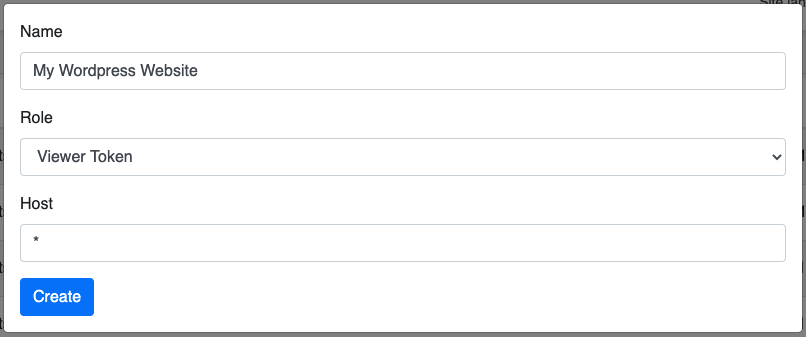
You’ll see a new popup window with the Access Token. Copy the access token and save it for your future reference. Warning: For your product’s security, the access token will only be shown once and cannot be retrieved again. Thus, you will have to create a new access token if you need one.
Note:
- The Viewer token is meant for viewing of the products in third-party integrations. For usage with plugins, embedding on-site, etc, the Viewer token should be used.
- The Host field can take either a value of ‘*’ or a specific domain name through which Expivi’s API will be allowed to be called for the created API Key.
3. Making the API connection
Go back to your WordPress admin page and go to Settings > Expivi settings. You’ll see five fields:
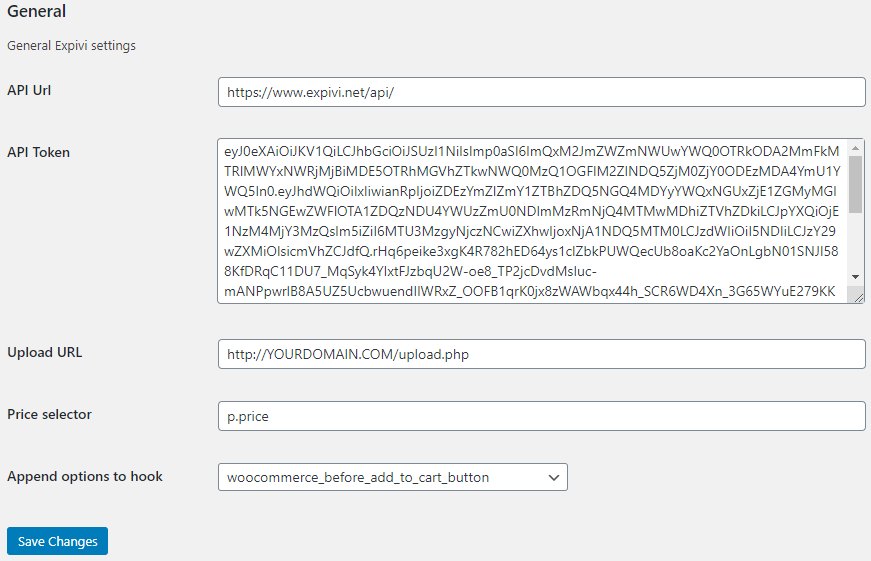
- API URL: enter https://www.expivi.net/api/ in this field.
- API Token: enter the complete access token you’ve just created in this field.
- Upload URL: if you’re going to use the image upload feature to allow product personalization, you need to enter the upload URL. If this has not been prefilled already, enter https://WWW.YOURDOMAIN.COM/upload.php NOTE: developer support is required when you want to make use of uploading images. This is not in the plugin by default.
- Price selector: in order to display the dynamic Expivi price, we need to locate the original WooCommerce price to replace it. The standard selector for the WooCommerce price is p.price (
<p class="price">). If your WordPress theme uses a different selector, enter the correct selector here. - Append options to hook: the Expivi options can be placed before or after the “Add to cart” button. This can be changed later.
Hit “Save Changes” and you’ve created the API connection.
4. Connecting the products
Now that you’ve setup an API connection, it’s time to add the 3D product configurator to the WooCommerce product pages.
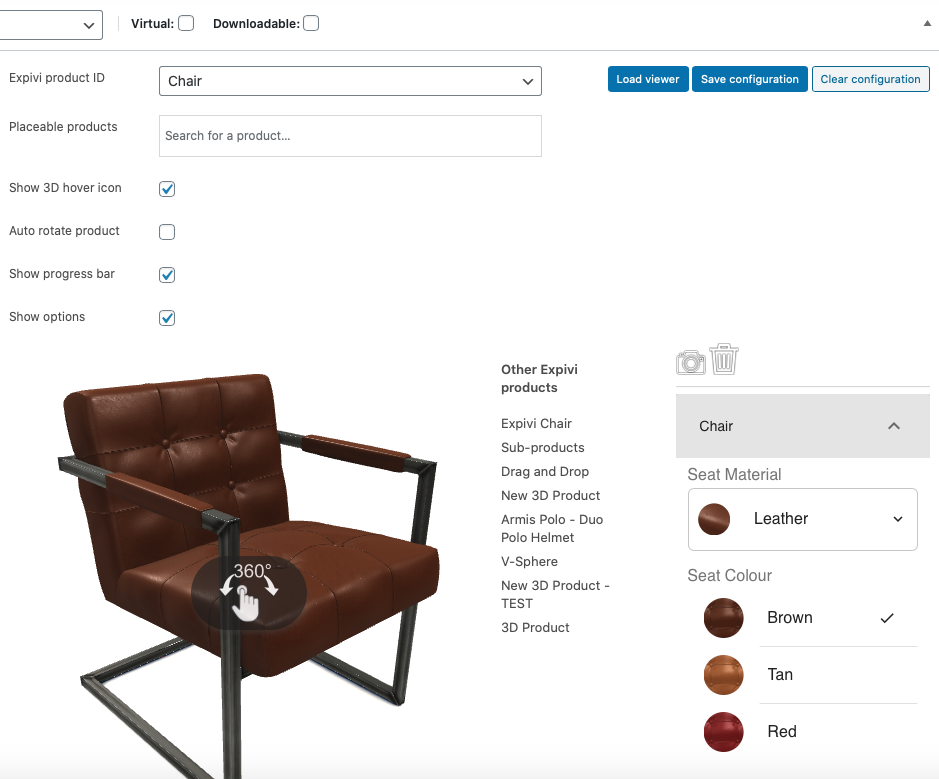
On the WordPress backend, go to Products > All Products. Create or click on an existing product that you want to integrate with Expivi. Now go to the Expivi product tab inside the product settings.
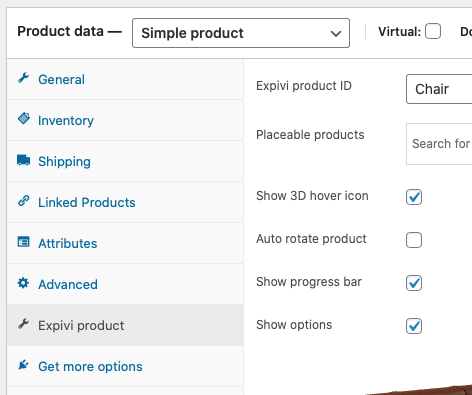
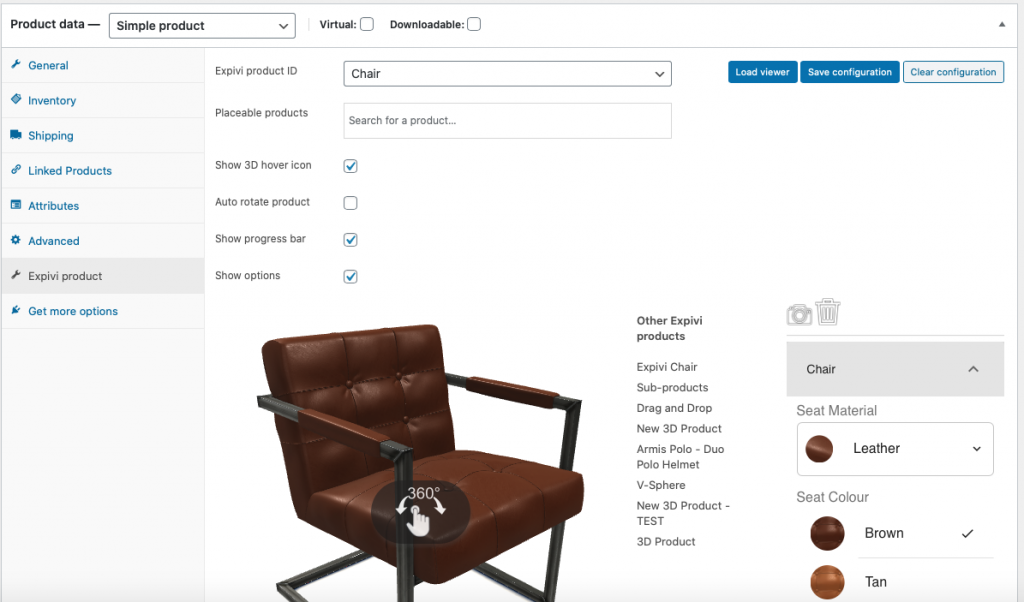
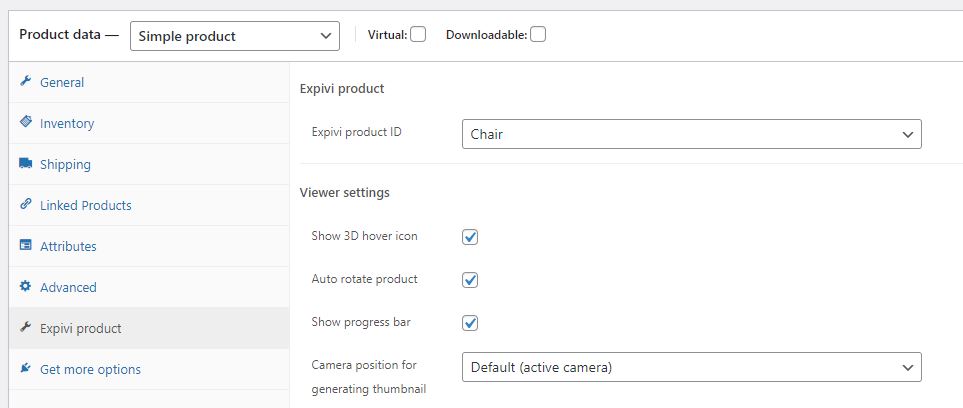
The “Expivi product ID” drop-down selector is a list of all your Expivi products. Find and select the corresponding Expivi product.
You will now see the product in the preview area. Now, click on “Update” in the top right corner of the product settings page to save the product.
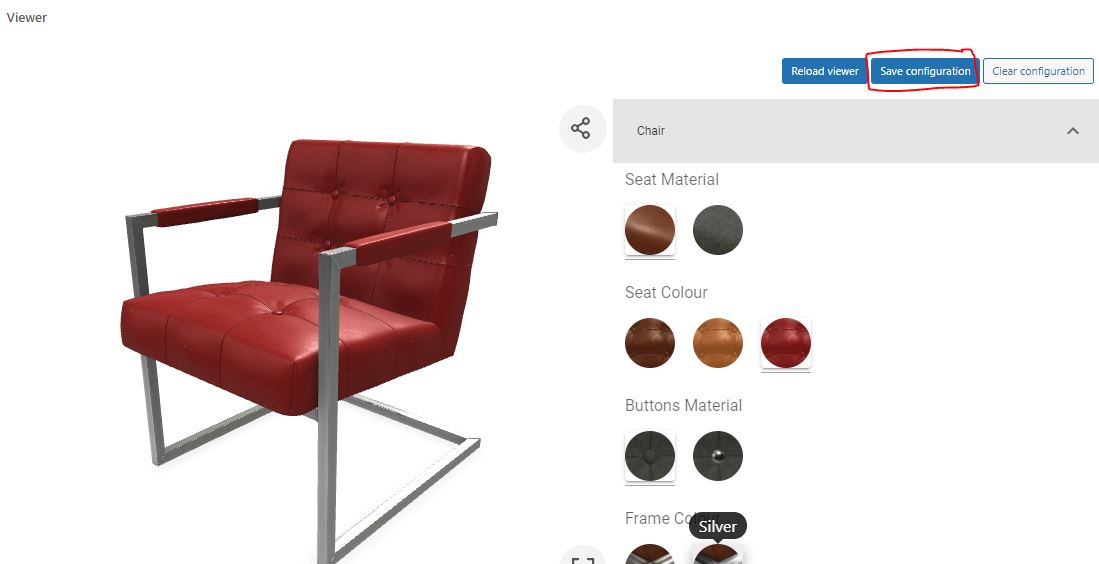
Optionally: Checkbox options, you may notice in the Expivi product tab that there are a couple of checkboxes where some of them are already active. The options will help you configure the way how the viewer should be displayed on your website. You could show/hide the 3D hover icon, auto rotate the product, show/hide the initial progress bar, or hide the options panel and just show the viewer (most-likely used with pre-defined configuration).
Optionally: pre-defined configuration, you can configure the product in the way you would like it to show for the first time on page load. After configuring, you need to click on “Save configuration” and then “Update” in the top right corner. All your customers will now see the product in the way you configured it.
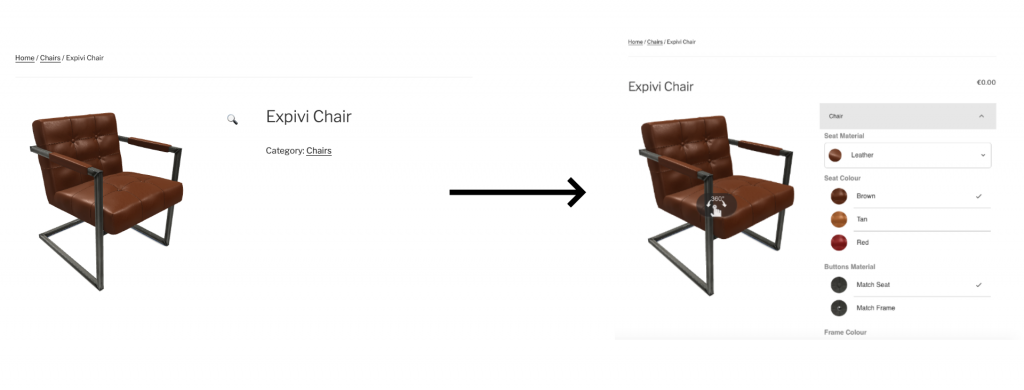
You have now replaced the standard WooCommerce image viewer and options selector with the Expivi 3D configurator. Repeat this process for all other products.
Optionally: drag-and-drop, if you want to have a product that can add other products in the same scene, you can define the products that can be added to the scene in the “Placeable products” field. This field only accepts WooCommerce products that have a Expivi product linked to it. To add a product just search for the WooCommerce product name.
NOTE: when using this feature you will first need to create a drop-area that can be configured at Product > Showcase in the backend of expivi |
After configuring drag-and-drop, the Options selector view changes on the website to show three additional menu-tabs:

Add Product: Shows a list of products. To add a product to the scene, the customer simply needs to drag the product to the scene.
Configure Product: Allows the customer to configure the selected product.
Overview: Shows a list of all the products in the scene. Here you can delete a product from the scene or click on one, which brings you to the configuration of that product.
Done! Expivi is now integrated with your WordPress WooCommerce shop.
Create presets to display multiple versions of your products
If you would like to show your customers different versions of your configured products (e.g. different colors), then you could use the preset functionality to create preconfigured products. Please keep in mind that you’ll need to create a new product for each version.
- Create a new product, go to the “Expivi product” tab and choose the 3D product you want to link this product with (as explained before). Save the product.
- Open the “Expivi product” tab again and scroll down. You’ll find the configurator.
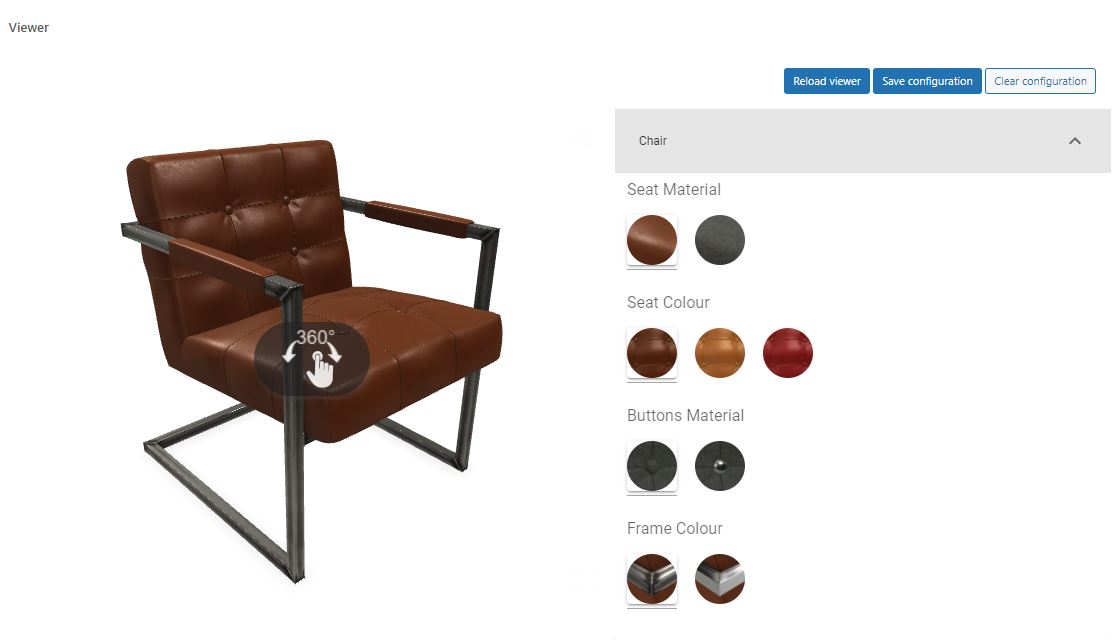
- Configure the product and choose the options you want to have preselected for this version of your product.
- Once you’re done, click on the “Save configuration” button AND save the product again.
Everytime the customer opens this version of the product, the chosen options of this preset will be loaded initially. Customers can still configure the product.
Adding a product to the cart
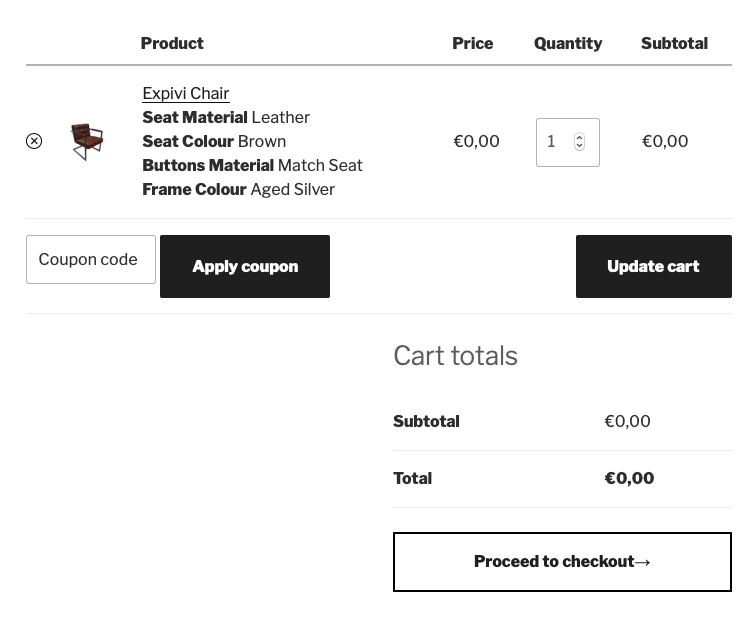
We’ve enhanced the process of how users will view their products in the cart by making the experience more personal. The plugin will take a screenshot of your product once the user clicks on the ‘Add to cart’ button. The screenshot will be shown in the cart next to the products configuration. The configuration will also be a nice reflection of what the customer has configured.
Viewing your orders
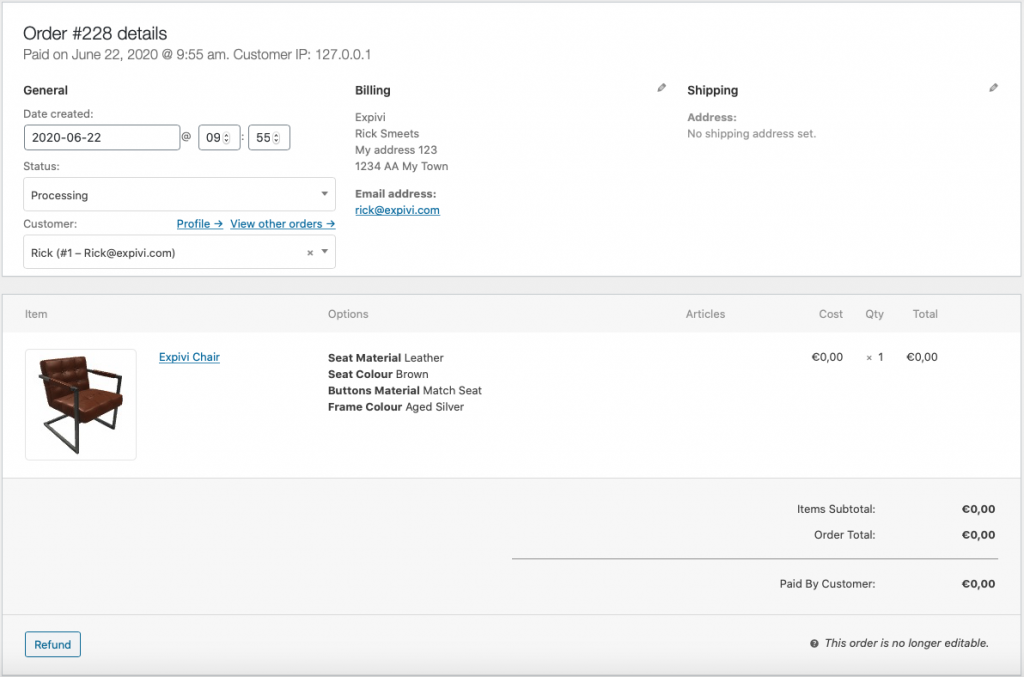
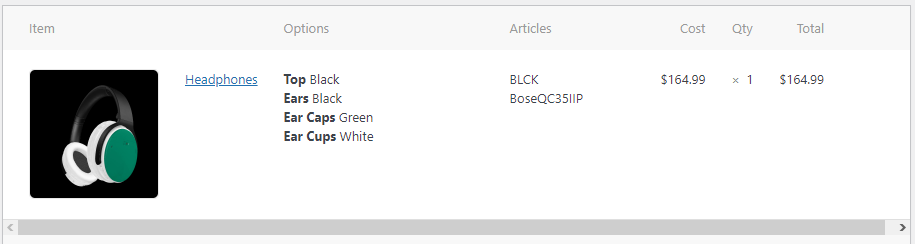
Of course, we didn’t forget about our webshop administrators. The orders will contain an overview of the configured product(s), showcased with a screenshot of the product. The ‘Options’ area will show the chosen options while the ‘Articles’ will show the corresponding SKU’s.
Additional features
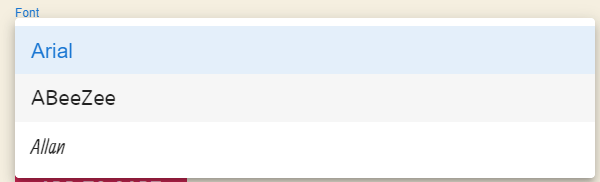
1. Using custom fonts
NOTE: custom fonts are only supported from Expivi version 1.6.1 and onwards. |
When using the text_to_image attribute to show text in the product configuration, you may wish to have customers choose from custom fonts.
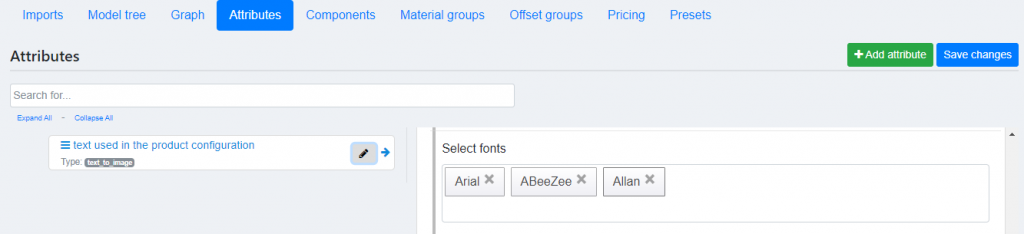
To be able to use these fonts in your WooCommerce shop, you will have to make some changes in the WordPress settings. As seen in the image above we added two custom fonts in addition to the standard Arial font. To load these fonts in the WooCommerce shop, some CSS has to be added to the Additional CSS page in WordPress.
Here is how:
Go to https://fonts.google.com/ and add the desired fonts by clicking +. Now open Families selected in the bottom right. There will be a <link href=”etc… copy the part between the href=”(copy this part)” and open this in a new tab.
Copy the entire page and paste it in https://WWW.YOURDOMAIN.COM/wp-admin/customize.php > Additional CSS. Now publish it.
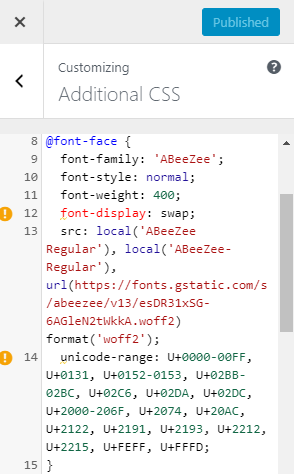
Done! The custom font will now work within your shop.
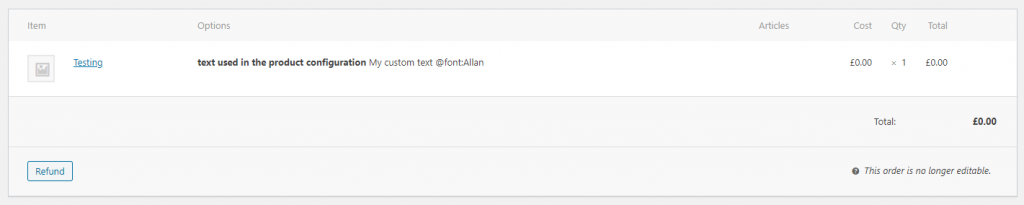
Now within an order, you will be able to see the selected font and text. Unless the customer did not change anything.
2. Image upload
You can allow customers to upload an image (for example a custom print on a shirt). To enable this you have to use the image_upload attribute in the CMS configuration.
In order to make the upload functionality work inside WordPress WooCommerce (we assume your product already has the upload attribute working correctly):
- Download the upload.php file here: https://download.expivi.com/woocommerce-upload.zip
- Unzip the zip file and upload it to the server where your WordPress WooCommerce site is installed, e.g. https://www.yourwebsite.com/woocommerce/upload.php
- Go to the settings menu of the Expivi WooCommerce plugin and enter the file path in the Upload URL field

- Click on the Save Changes button
After this is implemented, customers can add a custom image.
Now within an order, you will be able to see the URL of the image that the customer uploaded.

Done!
3. Localization
NOTE: localization is only supported from Expivi version 1.6.1 and onwards. |
Localization works out of the box for the Expivi plugin (after it has been configured in https://admin.expivi.net/). However, the website language should be configured in the WordPress Settings, as intended, so that the language gets transmitted to Expivi system.
How to use the bundled product feature
Since version 3.6 of the Expivi WooCommerce plugin, it’s possible to create bundle products in combination with Expivi’s 3D configurator. With bundle products you can have each part of the main product (e.g. accessories or parts) as a separate product in the order details with its own SKUs. You can also manage stock levels of each sub product with this feature, so that your customers can’t order products with sub products not in stock.
The main product created in WooCommerce needs to be linked to the 3D product from your Expivi account. For each part of the product, you’ll need to create a simple product with the same SKU as you’ve set in the 3D model.
1. Set SKUs in your 3D product for each part
It’s important that each part of the main product that is processed as a separate part of the bundled product, has its own SKU. Please refer to our getting started tutorials to learn how to add SKUs to each part of the product.
To see if the SKUs have been set correctly, right click on the page with the 3D product on it, choose “Inspect element” to open the inspector. Go to the “Console” tab and type “window.expivi.saveConfiguration()”.

The JSON code of the complete configuration will be displayed. Navigate to Object > configured_products > articles and you’ll see that the parts will have a models_sku value. This is the SKU of this part.
2. Create the main product
First create the main product in WooCommerce and make sure the product is a simple product. Go to the Expivi tab and link the corresponding 3D product first.
For the “Add to cart process” option, choose “Generate grouped product” or “Generate grouped product and use custom price”.
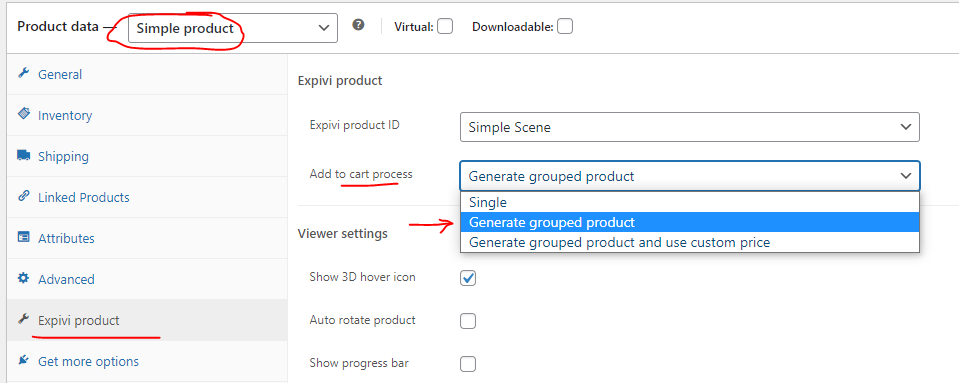
Click on the “Publish” or “Update” button to save the product.
3. Create a simple product for each sub product
After you’ve created the main product and linked it to the 3D product, you’ll need to create a separate simple product in WooCommerce for each part of the main product with its own SKU. Make sure the SKU of the sub product matches exactly with the SKU you’ve set in the 3D product (the models_sku value).
Enable stock management if you want to manage the stock levels of the sub products.
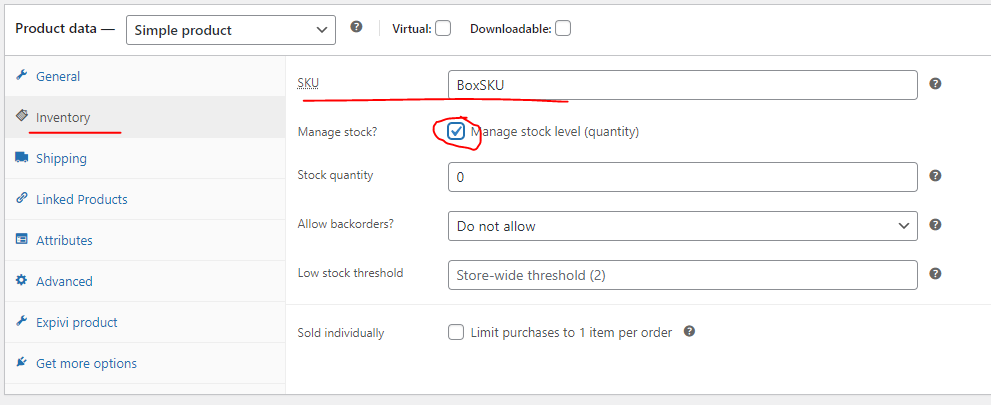
Leave “Manage stock?” unchecked if you don’t want to manage stock of the sub products.
Note: make sure that each part of the main product with a separate SKU has a separate WooCommerce product. Otherwise you won’t be able to add the main product to the cart.
4. Create a test order
To test if everything is set up correctly, open the main product, add it to the cart and complete the order and checkout process.
Note: Whenever a customer adds a bundled product to the cart, a bundled version of the product with a random SKU will be created in the backend of WooCommerce. This is necessary to make the bundled product feature to work. This product is automatically set to hidden.

Getting order and configuration details
So you’ve finally uploaded the 3D models to Expivi and integrated the 3D product configurator with your WooCommerce webshop. Now it’s time to sell and receive your orders. In this section we’ll explain how you get your customers’ configuration details in WooCommerce.
Setting SKU and Attribute pricing details
If you want to add SKUs and/or specific prices to specific options, you will need to login to your Expivi account and edit the 3D model.
Add a base price and SKU to the product
Go to your product in your Expivi account and add the base price in the Basics tab.
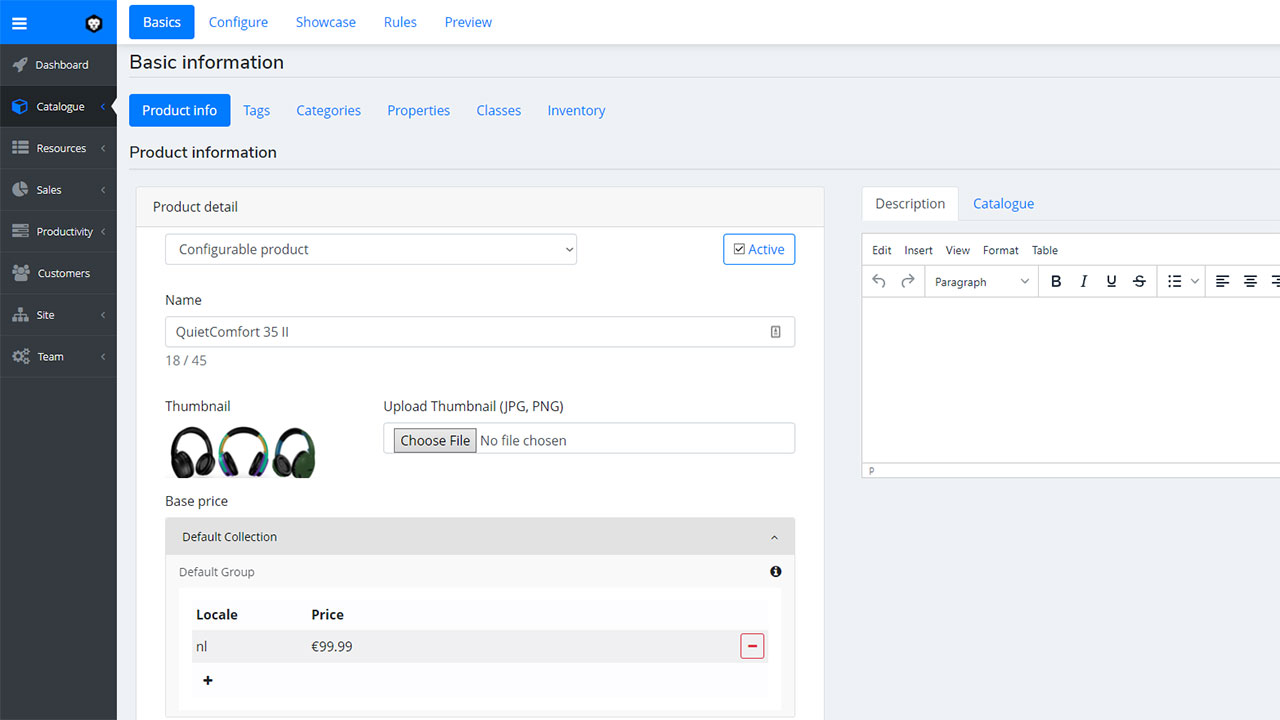
Add a SKU to the product
To add a SKU to the product, you can go to your product in your Expivi account and add the SKU in the Basics tab. Note: the SKU in this field is for the main product.

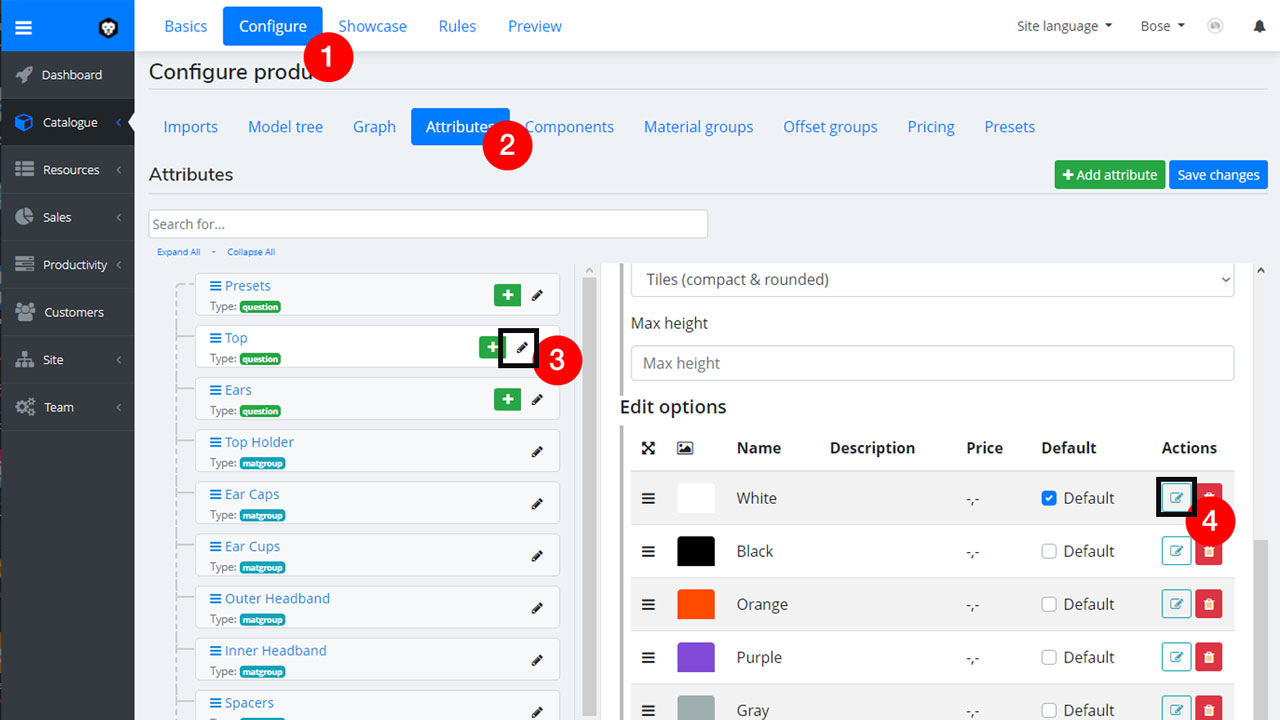
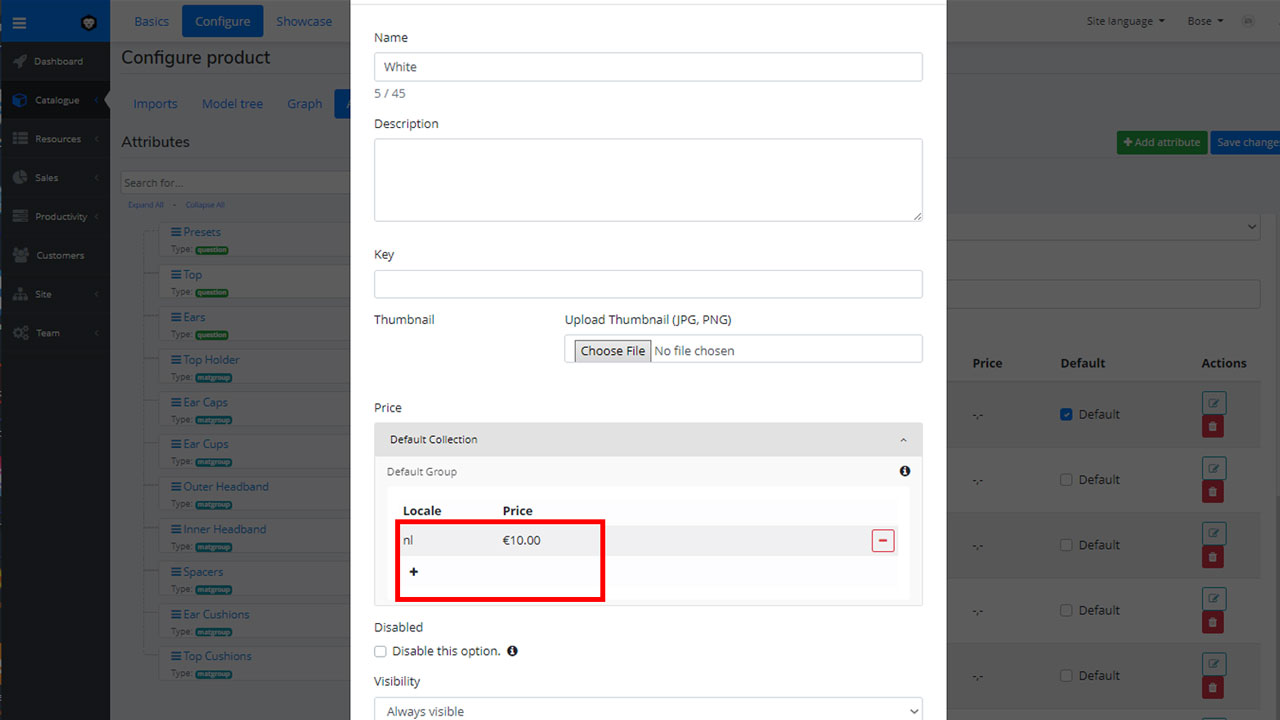
Add a price to each option of a product (attribute pricing)
If you have a product with options that each has their own unique price, you can do this by opening your 3D product in your Expivi product and navigate to Configure > Attributes to enter the price for each option.
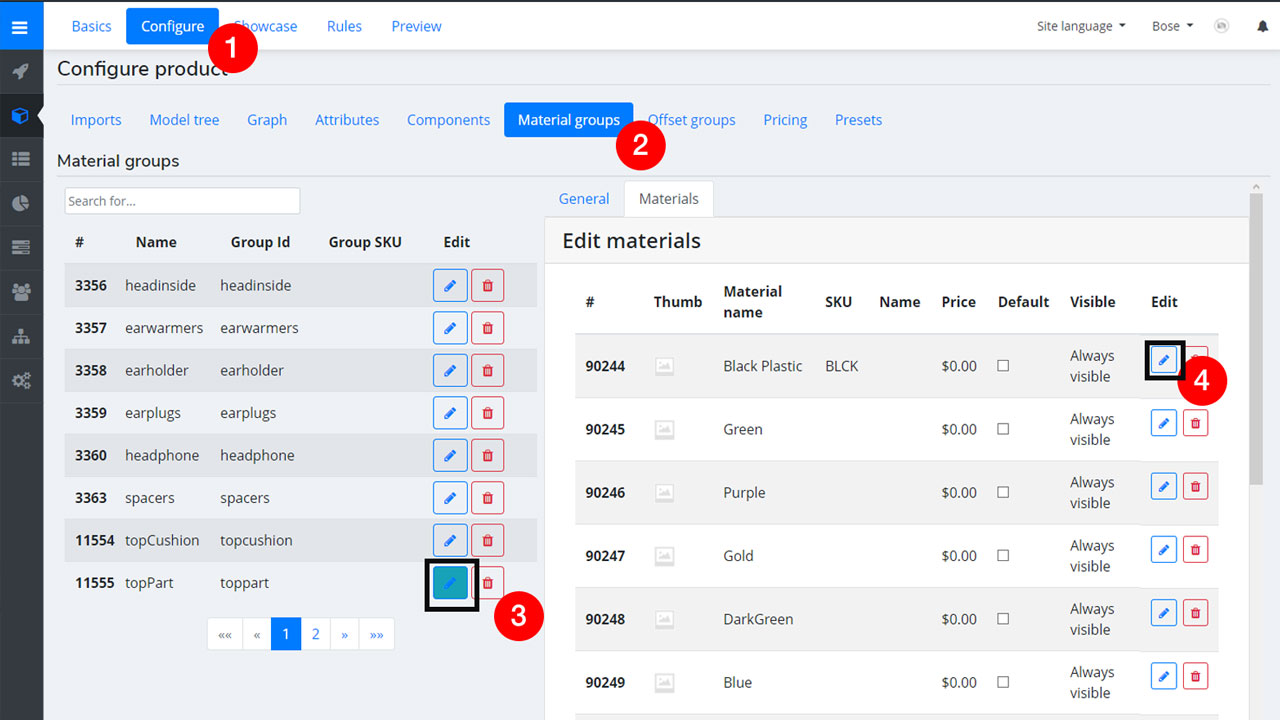
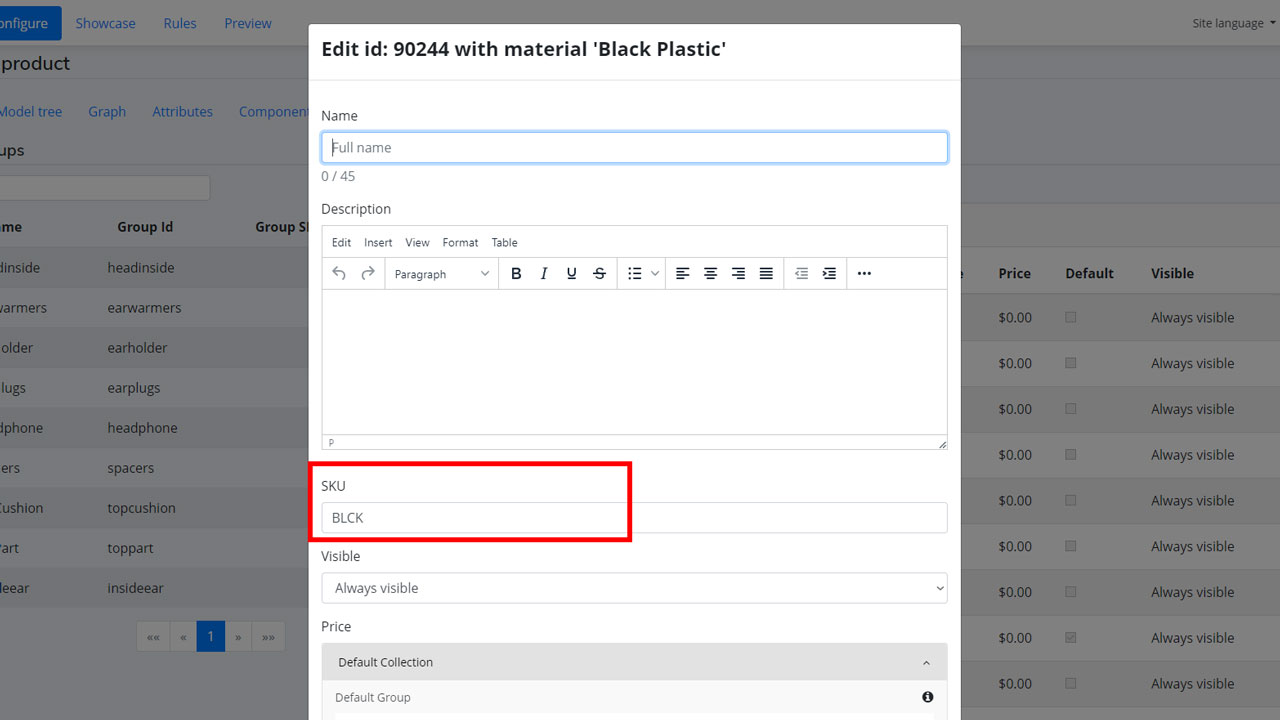
Add a SKU to each option of a product
If you’d like to add a unique SKU to each chosen option, you can do this by opening your 3D product in your Expivi product and navigate to Configure > Material Groups to enter the SKU for each option. Note: in this example the options that can be chosen are different materials. That’s why we edit each individual material.
Getting Attribute pricing details from WooCommerce orders
Once a customer has completed the order, you can go to WooCommerce > Orders to lookup the order. In the order details the complete configuration, including selected options and SKUs will be displayed nicely.
Because WooCommerce doesn’t have a native PDF invoice feature, you will need a third party plugin for this. We recommend using WooCommerce PDF Invoices & Packing Slips by Ewout Fernhout. With this plugin, you can download all order details with the complete 3D configuration as a PDF file.

Custom export for configuration details
Although WooCommerce has a lot of integration plugins for a wide range of ERP and CRM systems, sometimes you may not be able to find one or the available plugin is missing some features. In that case you can export the order details to an external CSV, XML or JSON file, so that your ERP or CRM system can use these files to import the order and configuration details from.
We recommend the paid plugin WP All Import (with the Export Pro add-on) by Soffly. With this plugin you can export your WooCommerce orders with all customer, order and Expivi configuration details to an CSV or XML file. This file may be imported automatically by your ERP or CRM system.
We refer to the documentation of WP All Import to setup the exports.
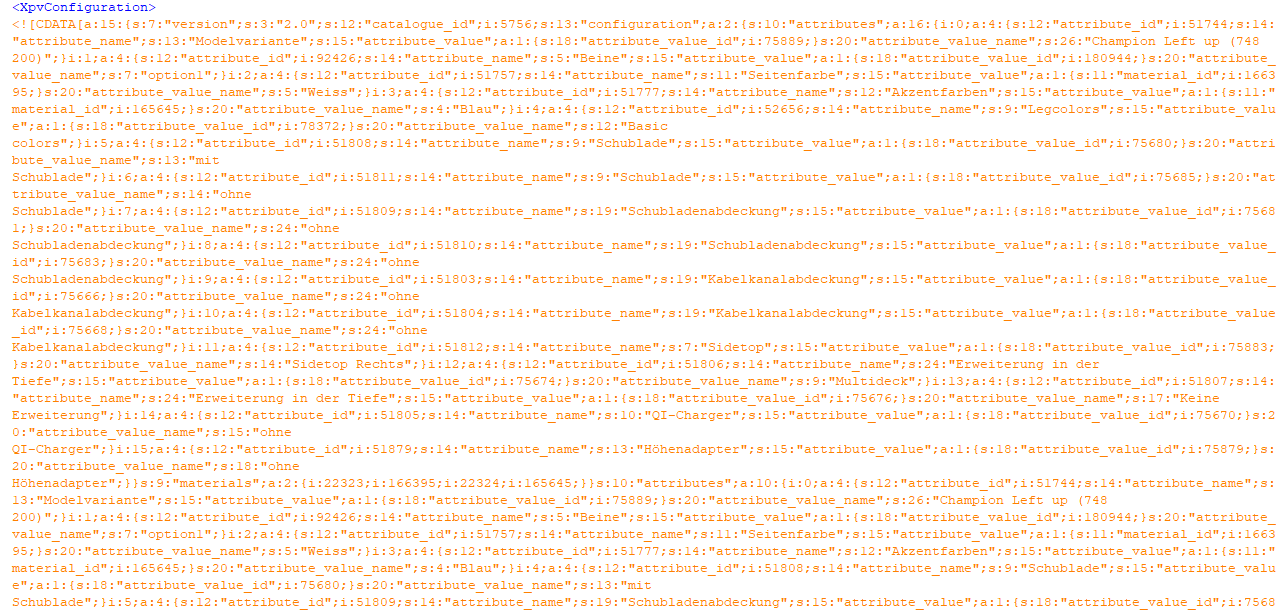
Below you can see how all Expivi configuration details look like in a XML export file. All chosen SKU and Attributes are present with their prices.
FAQ
In step 4, I don’t see anything in the drop-down selector
If the products are not showing up in the list, one of the fields is not correct or a product is not correctly configured. Check if there are any spaces in front or at the end of the API key or API url. Also, check you product in Expivi if the product slug doesn’t include spaces. If you still have troubles configuring the product, please contact Expivi and we’ll try to respond as quickly as possible.
After completing step 4, the product does not show in my shop page
If the product page does not show the 3D object it could be because the Shop page is not set in the WooCommerce settings. To fix this go to WooCommerce > Settings > Products and set the correct shop page. Now click on “Save changes”.
How can I use presets in Woocommerce?
Presets configured in the Expivi platform can not be used in Woocommerce as of yet. However, each WooCommerce product has an option to configure the product inside the product page. This configuration is (for now) a replacement for the presets.