This documentation will explain the usage and how to set up the offset nodes within your 3D software and in the Expivi platform.
This document is split up into two sections:
1 The Offset Node
2 The Rotate Offset Node
Within these topics, the different methods for setting up these nodes in your 3D software will be explained as these might work differently.
Table of Contents
Offset Node:
The offset Node is used to move an object in the X, Y, Z directions within the 3D space.
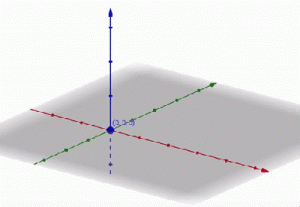
With this node you will be able to have your object move along the X-axis (left and right OR back and forth) Z-Axis (back and forth OR left and right) depending on your 3D software and the Y-axis (Up and Down)
A combination of all these axes is possible to have the object move left, right, back, forth, up and down within the 3D space.
To set up this functionality before uploading your 3D files to Expivi you will have to create an Offset node within your file.
Create a new empty node within your file, all the objects/meshes you wish to affect with this offset will need to be inside of this new group. This group will use a naming convention to trigger the functionality within Expivi. The naming convention is: off_ followed by the name of the group, and closed with _E just like all other attribute nodes that are set up.
Create a new attribute in the attribute panel in Expivi. With these you will control the offset, for example, a draw, you want to have an “attribute” that is named ‘draw’ and contains an option for ‘open’ and ‘closed’
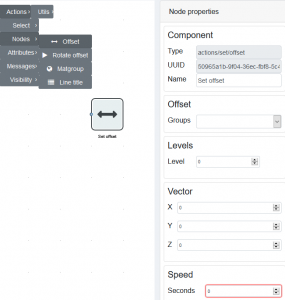
Within you ruleset create an ‘Offset’ node by going to ‘Actions’ followed by ‘Nodes’ and select ‘Offset’
This node you want to attach to a ‘Check Option’ node, this node will check if the option is ‘ON’ or ‘OFF’ and triggers the correct offset node for each of these.
In the ‘Node Properties’ panel, you first want to select the offset group you want to set, in the drop-down, you will find the attributes you have set up in your file.
If you are using multiple directions you want to split these in X Y Z axis and create a separate node for each. Use the ‘Levels’ property to set these to a different dependency so these Axis will no longer conflict.
The ‘Vector’ settings is the position set for the offset. Setting a vector to 1 will move it 1 unit within the 3D space. One unit is each square on the grid you see in the ‘Showcase’ tab.
last the speed property, this is the time it will take for the object to reach the position set.
After setting up the ‘open’ node the ‘closed’ node will be simpler, all the ‘Vector’ settings will remain on the zero (0) position, this will mode the objects back to there default location. The speed and other sections will be the same as for the ‘open’ node.
Rotate offset Node
Maya will have to create a new group, all the objects/meshes you wish to affect with this offset will need to be inside of the new empty group.
MAYA*
The offset group in Maya will need some more steps to function properly.
The group that contains all the objects affected by the offset node will need to be frozen to the correct position. To do this select the ‘Freeze Transformations’ modifier found in the ‘Modify’ tab in Maya or by selecting the following button:
Now you will have to move the group itself to the middle of the scene, the 0, 0, 0, position.
By doing this, the transforms of this attribute will change
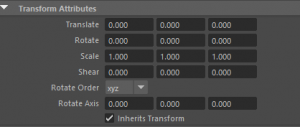
The values in ‘Translate’ will change, remember these values as you will need them later on. Right them down in a place you have easy access to. After doing this you want to Freeze the Transformations again.
The values in ‘Translate’ will now all be set to 0.000 again.
Now you want to re-enter the values you have written down from before.
Depending on what Axis the object has moved you want to add a minus (-) before either of the 3 input fields in translate until the object has the correct default position again, this will be the same location as when you started. If done correctly this now should work properly in Expivi.
The ‘Rotate Offset’ node is found in the same tab like the other offset node in the ‘Rules’ tab in Expivi.
Most of the settings in the properties are the same as for the regular offset node, however, the ‘Vector’ input is set to degrees, from 0 to 360. If for example, you have a door, X, Y, Z can be set to 90 to have the door open 90 degrees and to close the door, you want to set al values back to zero (0) again.
Combining the regular offset node and the rotate node is possible if, for example, you want to animate an object when it moves in the X, Y, Z, directions while turning a set degree.
If you want to move an object first before rotating or vice versa you want to set a delay between the ‘Check Option’ node and the ‘Offset’ Node.
The value within the node is set to milliseconds so keep this in mind when setting this node.